Mastering Train callouts in CS2 is the difference between a coordinated team and chaos. I’ve spent hundreds of hours on this map across competitive matches, and I can tell you that knowing every position name by heart transforms how your team communicates.
This comprehensive CS2 Train map guide covers every callout, lineup spot, and communication tip you need to dominate. Whether you’re just learning Train or looking to refine your team’s callouts, this guide has you covered.
Why Train Callouts Matter in CS2?
Clear communication wins matches. When you call “A Main pushed” instead of “they’re coming from somewhere over there,” your team reacts instantly. Train is one of CS2’s most complex maps with multiple levels, connector corridors, and hidden angles.
Every position on Train has a specific name that the community has standardized. Learning these CS2 Train map callouts means you can:
- Coordinate executes and retakes efficiently
- Rotate before enemies even reach your position
- Trade kills effectively with teammates
- Avoid confusion in high-pressure situations
After practicing these callouts in Deathmatch and casual matches for weeks, I saw my team’s coordination improve dramatically. We stopped losing rounds to miscommunication and started winning more clutches.
CS2 vs CS:GO Train Map Changes (July 2026)
Train received significant visual updates in CS2, though the core layout remains familiar. The graphics engine overhaul changed how areas look and feel, which affects callout recognition for players transitioning from CS:GO.
Key visual changes include improved lighting throughout the map, more detailed train models, and enhanced textures on walls and floors. These changes make some areas feel more open while others feel tighter and more claustrophobic.
The good news is that most callout names remain the same. However, some positions have new visual markers that make them easier to identify. For example, the “E-Box” area has more distinct environmental details that help you recognize it faster.
If you’re coming from CS:GO, your existing Train knowledge transfers well. Focus on learning the visual differences rather than relearning the entire map layout.
10 Essential Train Callouts to Learn First
Don’t try to memorize everything at once. Start with these critical positions that dominate most rounds:
- A Main – The primary T approach to A site
- B Halls – The corridor connecting T spawn to B site
- Ivy – The narrow path behind A site
- Z Connector – The central hub connecting all areas
- Popdog – The ladder room near A site
- E-Box – Electronic box position on A site
- Upper B – The elevated area overlooking B site
- Bomb Train – The train car where bomb plants often happen
- Heaven – CT sniper position above A site
- Hell – The area beneath Heaven on A site
Master these ten first, then expand your vocabulary as you play more matches. I recommend practicing callouts in Deathmatch by saying every position name out loud when you enter it.
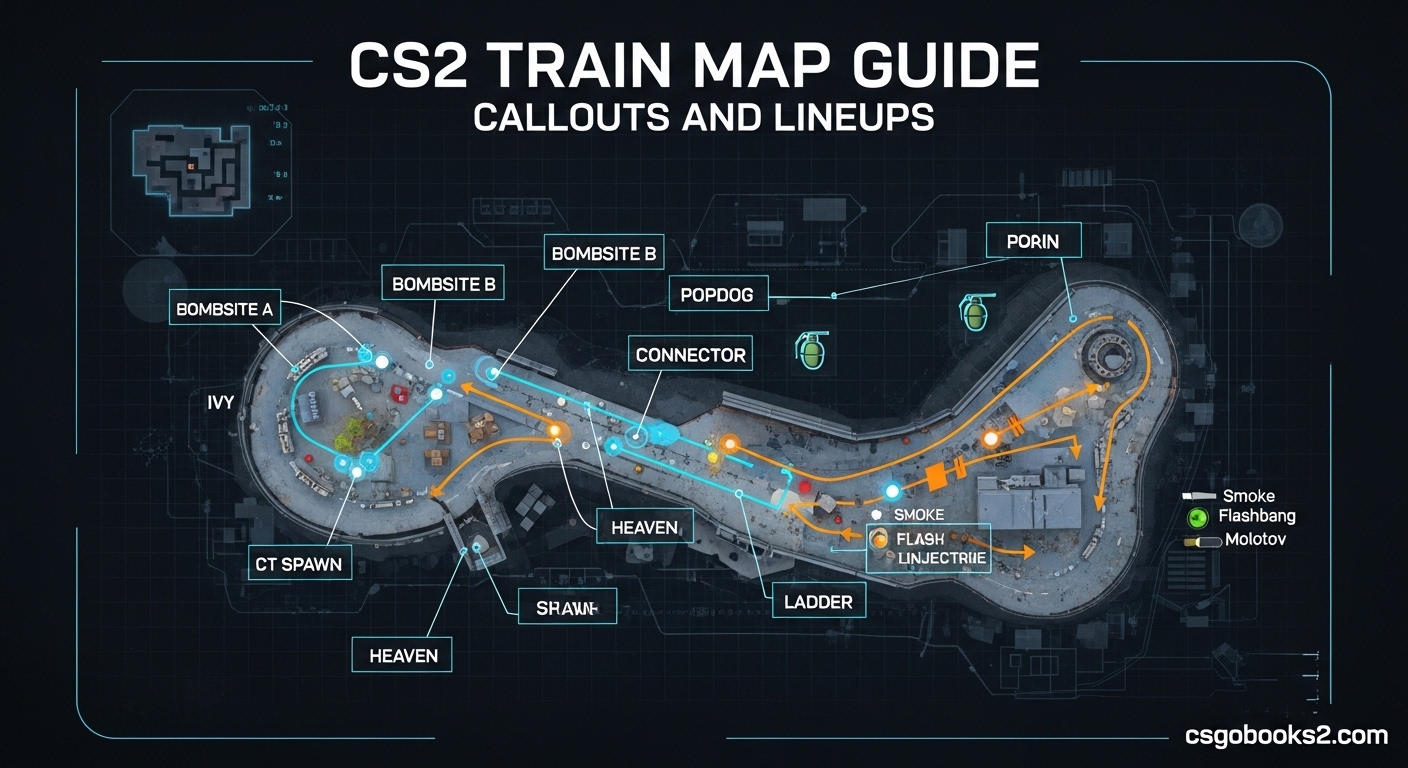
CS2 Train Map Guide Callouts and Lineups – A Site
A Site is the more commonly attacked bombsite on Train, featuring multiple angles and elevation changes. Let’s break down every position:
A Main
A Main is the primary approach for terrorists attacking A site. It’s a long, open area with train cars on both sides providing cover. CT players often hold angles from inside A Main or from Heaven overlooking the entrance.
When calling A Main, specify exactly where you saw enemies. “A Main long” means they’re deep in the corridor, while “A Main stairs” indicates they’re near the entrance closer to mid.
Popdog / Ladder
Popdog is the room containing the ladder that leads from lower areas up toward A site. In CS2, this area has improved lighting making it easier to identify. The ladder provides a quick vertical route for players rotating between levels.
CT players sometimes hold Popdog with aggressive peeks, catching T players off guard. If you’re holding this area, listen for footsteps on the metal ladder – they’re very audible in CS2’s updated sound engine.
E-Box
E-Box (short for Electronic Box) is a crucial piece of cover on A site. It’s the large electrical box structure near the center of the site. CT players frequently hold behind E-Box, peeking at A Main entries.
Utility usage around E-Box is essential. Molotovs here flush out CT holds, while smokes block vision from E-Box to other A site positions. If you’re planting, E-Box provides solid cover from multiple angles.
Yellow and Red
Yellow and Red refer to the colored train cars on A site. The Yellow train is positioned closer to A Main, while Red train sits deeper toward the back of the site. These color-coded callouts make instant communication possible.
“They’re on Yellow” immediately tells your teammates exactly which train car enemies are using. This specificity is crucial for retakes and executes. The Yellow train often sees action during default rounds, while Red becomes more important during post-plant situations.
Sandwich
Sandwich is the small gap between two train cars on A site. It’s a tight angle that CT players sometimes hold with shotguns or pistols. The name comes from the sandwiched position between the two trains.
This position catches over-aggressive T players who don’t check angles carefully. If you’re attacking A site, always clear Sandwich before committing to the site. One CT holding here can delay your entire execute.
Hell
Hell is the lower area beneath Heaven on A site. It’s a dark, enclosed space that players use to rotate unseen or hold unexpected angles. The name “Hell” contrasts with the elevated “Heaven” position above.
Hell connects to other lower areas and provides flanking opportunities. CT players holding Hell can catch T players who have already passed and are looking elsewhere. Check this area carefully during site takes.
Heaven
Heaven is the elevated CT position overlooking A site. It’s a prime sniper spot where AWP players watch for T pushes from A Main. The height advantage gives Heaven players a commanding view of the entire site.
If you’re attacking A site, you must clear Heaven before planting. Smoke grenades can block vision from Heaven, but CT players will reposition quickly. Flashbangs are effective for blinding Heaven holds during executes.
Old Bomb
Old Bomb refers to the previous default plant location on A site. While bomb plant positions vary, Old Bomb remains a reference point that players still use. It’s near the back of A site, close to Alley and Kitchen.
Experienced players know exactly where Old Bomb is, making it useful for communication. “Planting Old Bomb” gives teammates precise information about where to set up their post-plant defense.
Alley
Alley is the narrow passageway on the side of A site. It connects to other areas and provides alternative routes for both attackers and defenders. Alley sees action during rotates and flanking maneuvers.
The tight confines of Alley make it dangerous to push blindly. Always use utility or teammates to check Alley before committing. CT players sometimes hold Alley with shotguns, catching unsuspecting players.
Kitchen
Kitchen is the area near the back of A site with kitchen-themed environmental details. In CS2’s updated graphics, this area is more visually distinct, making it easier to identify. Kitchen connects to Alley and provides rotation options.
During executes, Kitchen becomes a key position for CT players trying to survive the initial attack. If you’re clearing A site, don’t forget to check Kitchen – enemies might be waiting there to catch you from behind.
B Site Callouts
B Site on Train features more verticality than A, with multiple levels and complex angles. Here’s every position you need to know:
B Halls
B Halls is the corridor connecting T spawn to B site. It’s the primary route for terrorists attacking B, featuring a long straightaway with cover positions along the walls. CT players sometimes push into B Halls for aggressive picks.
Communication in B Halls requires specificity. “B Halls entrance” means enemies are just entering from T spawn, while “B Halls deep” indicates they’re near B site. This precision helps your team rotate and position correctly.
B Ramp
B Ramp is the sloped area leading down toward B site. It provides elevation changes that affect engagement angles. Players coming down B Ramp have height advantage over those below, but become exposed to multiple angles.
Utility usage on B Ramp is critical. Smokes block vision from B site positions, while flashes blind defenders holding angles. Molotovs deny area control and force enemies out of position.
Upper B
Upper B is the elevated area overlooking B site. It provides a strong defensive position with good sightlines to key approaches. CT players often hold Upper B with rifles or snipers, watching for T pushes.
If you’re attacking B site, you must deal with Upper B holds. Smokes can block vision, but CT players will reposition. Coordinate with your team to flash and clear Upper B before committing to the site.
Catwalk
Catwalk is the narrow raised walkway on B site. It provides a precarious position with limited cover but good visibility. Players on Catwalk are exposed but can see much of the site.
Catwalk holds are risky but rewarding. One well-positioned player can delay an entire execute by getting picks from Catwalk. However, a single well-placed molotov or smoke neutralizes this position quickly.
Headshot
Headshot is a specific position on B site named for its height relative to player models. It’s an angle where players’ heads are naturally exposed, making headshots more likely. This callout warns teammates about a dangerous angle.
When someone calls “Headshot,” your team knows to be careful approaching that area. It’s a position that favors defenders with good aim, as the exposed heads make for easier one-tap opportunities.
Bomb Train
Bomb Train is the train car on B site where the bomb is most commonly planted. It provides solid cover for the planter and allows for versatile post-plant setups. The Bomb Train’s position makes defuses challenging for CT players.
When planting at Bomb Train, call it out so your team knows where to set up. Different plant positions on or near Bomb Train require different post-plant positions. Clear communication here wins rounds.
Oil
Oil is a position on B site named for the oil drum or similar environmental feature. In CS2’s updated graphics, this area has more distinct visual markers. Oil provides cover and sightlines to key areas.
CT players sometimes hold Oil, catching T players who don’t check the angle carefully. If you’re attacking B site, always clear Oil before committing. It’s a classic position that enemies consistently use.
Back Site
Back Site refers to the area behind the main B site position. It’s deeper toward the B Halls side and provides rotation options. Back Site sees action during retakes and flanking maneuvers.
During post-plant situations, Back Site becomes crucial. CT players retaking B site must clear Back Site carefully, as T players might be hiding there to catch rotators. Good communication about Back Site status is essential.
Lower B
Lower B is the area beneath Upper B, providing different engagement angles. The vertical difference between Lower and Upper B creates tactical complexity. Players must constantly consider which level opponents might be on.
Utility usage changes significantly between Lower and Upper B. A molotov effective on Lower B won’t reach Upper B, and vice versa. Adjust your utility usage based on the specific position you’re targeting.
6 Stairs
6 Stairs is a staircase area on B site with six steps (the name varies in different regions, but the position is consistent). It provides vertical movement and sightline changes. Players moving up or down 6 Stairs become exposed to multiple angles.
This area becomes important during rotates and retakes. Controlling 6 Stairs gives your team options for positioning and movement. Coordinate with teammates when pushing or holding this staircase.
Mid and Rotation Areas
The central areas of Train connect all major positions and enable rotations. These callouts are essential for team coordination:
Ivy
Ivy is the narrow pathway behind A site that connects to other areas. It’s named for the ivy-like textures on the walls (in some map versions) or simply as a unique identifier. Ivy provides flanking routes and rotation options.
CT players sometimes push Ivy for aggressive picks, catching T players off guard. If you’re holding Ivy, listen carefully for footsteps – the narrow confines amplify sound in CS2’s updated audio engine.
Z Connector
Z Connector (often just called “Z”) is the central hub connecting multiple areas of Train. It’s a critical rotation point that sees constant action. Controlling Z Connector gives your team map control and flexibility.
Communication about Z Connector status is vital. “Z Connector open” means CTs can rotate freely, while “Z Connector contested” indicates ongoing fighting. This information helps your team make strategic decisions about positioning.
CT Tunnel
CT Tunnel is the corridor that CT players use to rotate between sites. It provides a relatively safe route when not under pressure. However, during executes, CT Tunnel becomes a contested area.
T players sometimes push CT Tunnel to catch rotating CTs or to flank. If you’re playing CT, watch for Tunnel pushes. If you’re playing T, controlling CT Tunnel disrupts CT rotations and creates opportunities.
Popdog / Underpass
Popdog (also called Underpass in some regions) is the area beneath the ladder room. It provides a low-profile route that players use to move unseen. The Underpass is particularly useful for flanking and avoiding detection.
This area becomes important during late-round situations. Players surviving the initial exchange might use Underpass to reposition and catch enemies by surprise. Always check Underpass during site clears.
T Connector
T Connector is the area on the T side of central Train that connects to various approaches. It’s a key area for T-side map control and executes. CT players sometimes push T Connector to disrupt T setups.
Utility usage in T Connector is high. Smokes block CT vision into the area, while flashes enable pushes. Coordinate with your team when contesting T Connector – it’s a critical position for T-side strategies.
Spawn Areas
Spawn positions affect round timing, initial engagements, and early-round strategies. Knowing spawn callouts helps your team start rounds effectively:
T Spawn
T Spawn is where terrorists begin each round. The exact position varies slightly based on spawn algorithm, but the general area is consistent. T Spawn provides access to both A Main and B Halls.
Spawn positions affect your opening strategy. A spawn closer to A Main might favor an A execute, while a spawn closer to B Halls enables a faster B push. Communicate your spawn position to teammates during the buy phase.
CT Spawn
CT Spawn is where counter-terrorists begin each round, positioned between the two bombsites. The location allows CTs to rotate to either site quickly. CT Spawn also provides access to CT Tunnel and other defensive positions.
CT spawn positions influence early-round positioning. Some spawns favor holding one site over the other. Discuss spawn positions with your team during the freeze time to optimize your defensive setup.
T Stairs
T Stairs is the staircase near T Spawn that provides vertical movement options. It connects different elevation levels and affects early-round routes. The stairs create different engagement angles compared to flat approaches.
Movement on T Stairs creates more sound than walking on flat surfaces. If you’re trying to be quiet, crouch-walk the stairs. If you’re rushing, use the stairs for speed but expect enemies to hear your approach.
CT Stairs
CT Stairs is the staircase near CT Spawn that CT players use to access elevated positions. It connects to areas like Heaven and Upper B. The stairs provide quick access to defensive positions but also create predictable paths.
CT Stairs becomes a choke point during T executes. If T players control CT Stairs, CTs lose quick access to elevated positions. Conversely, CTs holding CT Stairs can delay T pushes effectively.
Communication Tips and Best Practices
Knowing callout names is only half the battle. Using them effectively requires good communication habits. Here are practices I’ve learned from competitive play:
Be Specific
“They’re A” is not helpful. “Two A Main pushing, one Heaven” gives your team actionable information. Always include position, number of enemies, and what they’re doing.
Specificity enables precise reactions. When you know exactly where enemies are and what they’re doing, you can rotate before bombs are planted, trade kills effectively, and set up proper crossfires.
Use Numbers
Always call numbers of enemies. “Three B Halls” is infinitely better than “B Halls is busy.” Numbers tell your team how many opponents remain in other areas and how to adjust their positioning.
After a kill, update the count. “Two A Main, one down” means one enemy remains near A Main. This live counting helps your team track enemy positions throughout the round.
Call Damage
If you damage an enemy but don’t kill them, say so. “One A Main, 80 damage” tells your teammates that enemy is one tap away from death. This information enables trades and helps players decide whether to peek.
Damage calls are particularly important with AWPers. One body shot from an AWP leaves enemies at low health. Communicating this damage helps your team finish kills more efficiently.
Keep It Brief
Long callouts during active rounds get you killed. Practice saying the essential information quickly. “Three A Main pushing” is better than a paragraph explaining exactly what you saw.
Brevity becomes crucial during clutches and retakes. Your teammates need information immediately, not a detailed description. Save the explanations for round restarts.
Confirm Kills
When you get a kill, call it immediately. “One down” updates your team’s mental count of remaining enemies. This information affects rotation decisions and site retake strategies.
If you’re not sure whether you got the kill, say “Maybe one down” or check the scoreboard. Uncertain calls are better than no calls, but clarity is always preferred.
How to Learn Train Callouts Fast?
Memorizing callouts takes time, but you can accelerate the process with focused practice:
Step 1: Deathmatch Practice
Play Deathmatch on Train and say every callout out loud when you enter an area. “A Main,” “B Halls,” “Ivy” – speak every position name. This verbal practice reinforces memory through multiple senses.
I spent 30 minutes in Deathmatch doing this and saw significant improvement. By the end, I was recognizing positions instantly without thinking about names.
Step 2: Watch Your Own Demos
Review your competitive matches and pause at key moments. Ask yourself “what position is this?” If you don’t know, look it up and make a mental note. This targeted learning addresses your specific knowledge gaps.
After reviewing five of my matches, I identified several positions I consistently misidentified. Focused practice on these areas closed the gaps quickly.
Step 3: Call Everything
During casual matches with teammates, call every position you see or hear. Even if your calls aren’t perfect, the practice builds muscle memory. Your teammates will correct you, which accelerates learning.
I made mistakes early on, calling “E-Box” when I meant “Alley.” But each correction strengthened my knowledge. Don’t fear mistakes – they’re learning opportunities.
Step 4: Use Resource Maps
Keep a callout map image open on a second monitor while you play. Glance at it when you’re confused about a position name. Over time, you’ll need the reference less and less.
After about 10 hours of play with a reference map, I found I rarely needed to look at it. The visual associations had solidified in my memory.
Step 5: Team Practice
If you have a regular team, dedicate practice time to callouts. Run executes and retakes while focusing on clear communication. Team feedback improves everyone’s callout accuracy and speed.
My team spent one hour per week doing callout drills. Our coordination improved noticeably within a few sessions. The investment paid off in more wins and fewer communication failures.
Frequently Asked Questions
What are the callouts for CS2 Train map?
CS2 Train callouts include A Main, Popdog, E-Box, Yellow, Red, Sandwich, Hell, Heaven, Old Bomb, Alley, Kitchen for A site. B site includes B Halls, B Ramp, Upper B, Catwalk, Headshot, Bomb Train, Oil, Back Site, Lower B, and 6 Stairs. Mid areas are Ivy, Z Connector, CT Tunnel, and Underpass.
What is Popdog called in CS2 Train?
Popdog is the room containing the ladder that leads from lower areas up toward A site on Train. In CS2, this area retains the Popdog name and has improved lighting making it easier to identify. Some players also refer to this area as Ladder room or the Underpass area below it.
What are the basic callouts every CS2 player should know?
The ten essential Train callouts are: A Main (primary T approach to A), B Halls (corridor to B site), Ivy (narrow path behind A), Z Connector (central hub), Popdog (ladder room), E-Box (cover on A site), Upper B (elevated B position), Bomb Train (default B plant), Heaven (CT sniper spot), and Hell (lower A site area).
What is the difference between old and new Train callouts?
Most Train callouts remain the same between CS:GO and CS2. The main differences are visual – CS2 has improved lighting, more detailed textures, and enhanced graphics that make positions easier to recognize. The core layout and position names are consistent, so CS:GO knowledge transfers well to CS2.
How do I learn Train callouts fast?
The fastest way to learn Train callouts is: (1) Play Deathmatch and say every position name out loud, (2) Watch your own demos and identify positions you don’t know, (3) Call everything during casual matches regardless of accuracy, (4) Keep a callout map reference open while playing, and (5) Practice with a team focusing specifically on communication.
Conclusion
Mastering CS2 Train map callouts and lineups takes time, but the payoff is worth it. Clear communication transforms your team’s coordination and wins more rounds. Start with the ten essential callouts, practice consistently, and expand your knowledge gradually.
The difference between a team that communicates well and one that doesn’t is massive. I’ve seen teams with less individual skill outplay highly skilled opponents simply through superior communication and callout knowledge.
Put these CS2 Train map callouts into practice in your next match. Focus on being specific with your calls, and encourage your teammates to do the same. Within a week, you’ll notice the improvement in your team’s coordination and win rate.