Mastering CS2 Ancient callouts transforms how your team communicates and coordinates during matches. I’ve spent countless hours on this map analyzing every position, angle, and rotation path to help you dominate Ancient.
In this guide, you’ll learn every callout for A Site, B Site, and Mid, along with proven strategies that work in competitive play. Ancient has been part of the Active Duty map pool since Operation Broken Fang, and its unique Mesoamerican ruins aesthetic hides some of the most tactical gameplay in CS2.
Whether you’re new to Ancient or looking to refine your callouts, this guide covers everything from basic position names to advanced utility setups and mid-control strategies that professional teams use.
Ancient Map Overview (July 2026)
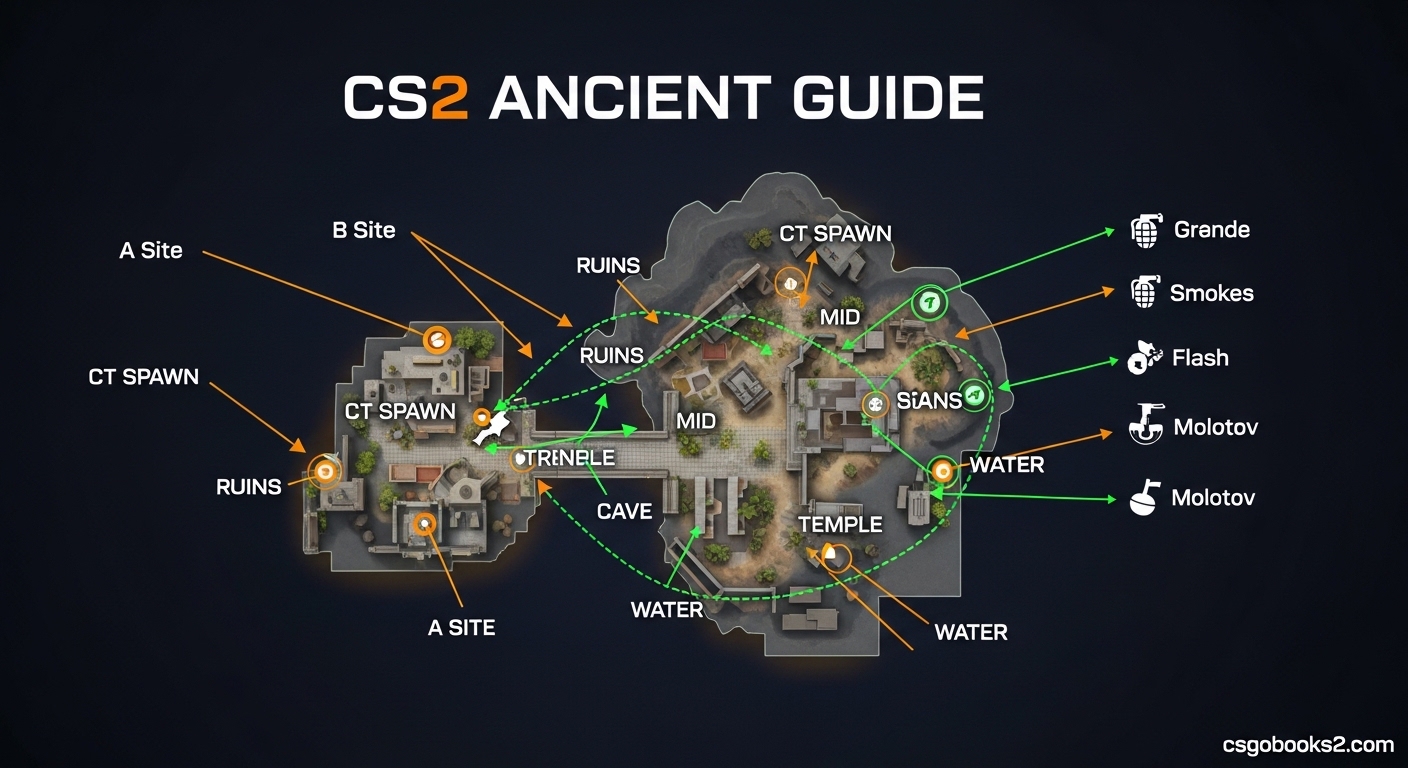
Ancient (de_ancient) is a competitive bomb defusal map in Counter-Strike 2 featuring an ancient Mesoamerican/ruins aesthetic with overgrown jungle elements. The map was introduced in Operation Broken Fang and has remained a staple in competitive play due to its balanced design.
What makes Ancient unique is its verticality and tight corridors mixed with open areas. The map features two bombsites connected by a central mid area that controls rotation timing. CTs hold advantages in defensive positions, but Ts can exploit multiple approach angles.
The current win rate sits at approximately 50.8% in favor of CTs, making it one of the most balanced maps in the Active Duty pool. This balance means both sides have viable paths to victory when executing proper strategies.
Ancient rewards teams with strong communication and map control. Unlike some maps where individual skill dominates, Ancient requires coordinated pushes, proper utility usage, and precise callouts to win consistently.
A Site Callouts – Complete Guide
A Site is located in the temple ruins area and features multiple defensive positions that CTs can use to delay pushes. Mastering these callouts helps your team coordinate executes and defensive holds effectively.
Jaguar: This is the iconic statue area near A Site entrance. It’s a common reference point for positioning and utility placement. CTs often hold angles from here, and Ts use it for cover during site executes.
Temple: The main building structure on A Site. This area provides cover and multiple angles for both attackers and defenders. Inside temple, you’ll find several positions that CTs use to hold the site.
Donut: A circular stone structure that provides cover during site takes. It’s called “donut” due to its shape and is a crucial piece of cover for Ts planting the bomb. CTs can also use this position for retakes.
Cave: A dark tunnel area leading to A Site from mid. This is one of the main approach routes for Ts attacking A. CTs often play aggressive positions here to catch pushes early.
Ramp: The sloped pathway leading up to A Site from lower areas. This is another common approach route and provides elevation changes that can be used for advantageous angles.
Tunnel: The underground passage connecting mid areas to A Site. Ts frequently use this for sneaky executes, and CTs must be aware of flank possibilities through tunnel.
Heaven: The elevated position overlooking A Site. CTs often hold this angle to watch for site executes. It provides a strong defensive position but requires good crosshair placement to hold effectively.
Pit: A lower area near A Site that provides cover during post-plant situations. Ts can plant and play from pit, making it difficult for CTs to defuse without clearing multiple angles.
When executing onto A Site, proper callouts make the difference between successful plants and failed attacks. I recommend using specific positions rather than generic terms like “pushing A” – say “pushing cave, need support” or “taking temple control, one donut.”
B Site Callouts – Complete Guide
B Site features a more open layout compared to A Site, with water elements and multiple defensive positions. The callouts here are crucial for coordinating executes and defensive holds.
Water: The shallow water area near B Site entrance. This is a key reference point for positioning and utility. Many firefights occur around water due to its central location in B approaches.
Pillar: Stone columns providing cover on B Site. These are essential for post-plant situations and defensive holds. CTs often hold behind pillars, and Ts use them for cover during executes.
Stairs: The staircase leading to elevated positions on B Site. This area provides elevation advantages and multiple angle opportunities. Control of stairs often determines who wins B Site engagements.
Window: An opening looking into B Site from adjacent areas. CTs frequently hold this angle to watch for pushes, and Ts must clear window during executes to avoid being picked off.
Tunnels: Underground passages connecting various areas to B Site. These provide alternative routes for both attackers and defenders. Ts often use tunnels for sneaky executes, while CTs must monitor for flanking plays.
Back Site: The area behind the main B Site position. This is crucial for post-plant situations and retakes. Ts can plant back site and play difficult angles for CTs to clear.
Front Site: The main area of B Site where the bomb is most commonly planted. This area has the most cover and defensive positions, making it the preferred plant location for most situations.
Courtyard: The open area leading to B Site from mid. This is a choke point where many engagements occur. CTs often play aggressive positions in courtyard to catch pushes early.
B Site executes require precise coordination. I’ve found that calling out specific positions like “pushing water, need smoke” or “taking stairs control, one window” helps teammates react faster and provide better support.
Mid Control – The Key to Victory
Mid control is arguably the most important factor in winning on Ancient. The team that controls mid has better rotation options, information about enemy movements, and opportunities for flanking plays.
Elbow: A curved pathway in mid that changes direction sharply. This is a common engagement area where players peek for information. CTs often hold elbow to catch pushes, while Ts use it for mid takes.
Xbox: Named for its shape resembling an Xbox controller, this area provides cover in mid. It’s a crucial position for both teams during mid fights. Control of xbox often determines who wins mid control.
Connector: The area connecting mid to both bombsites. This is essential for rotation timing and information gathering. Players in connector can support both sites and provide callouts about enemy movements.
Ruins: The central area of mid with stone structures and elevation changes. This area provides multiple angles and positions for mid control. Ruins is where most mid fights occur due to its central location.
Why do professional players focus on mid-control in Ancient? Because controlling mid gives your team information, rotation options, and the ability to support both bombsites. A team controlling mid can quickly rotate to defend sites or execute attacks with support from mid players.
For CT-side mid control, I recommend playing passive positions initially, then taking aggressive peeks for information. Use utility to delay pushes and gather information before committing to full mid control.
For T-side mid control, coordinate pushes with utility. Use smokes to block vision, flashbangs to blind defenders, and execute together as a team. Once you have mid control, you can attack either site with support from mid players.
Spawn Points and Rotation Paths
Understanding spawn points and rotation paths is crucial for timing your movements effectively. Ancient’s design means rotations can be fast or slow depending on which routes you take.
CT Spawn: Located closer to B Site than A Site. This spawn advantage means CTs can reach B faster but must rotate quickly to defend A. The spawn area also provides cover and defensive positions for retakes.
T Spawn: Positioned to give Ts multiple approach options to both sites. Ts can choose to take mid first or push directly to sites. Understanding spawn timing helps coordinate executes and catch CTs off guard.
Rotation Paths: CTs can rotate between sites through mid, connector, or outer routes. Each path has different timing and exposure to enemy positions. Fast rotations through mid are risky but can catch Ts off guard during executes.
Flanking Routes: Ancient offers multiple flanking opportunities for players who rotate quietly. Ts can rotate between sites through mid or outer paths, while CTs can rotate behind attackers who commit to sites.
Rotation timing is everything on Ancient. I’ve won and lost rounds based solely on how quickly we rotated. Call out rotations early – “rotating A to B through mid” or “flanking through tunnels” – so teammates can adjust their positioning.
Winning Strategies for Ancient
What are the best ways to gain an advantage on Ancient? Success comes from combining solid fundamentals with map-specific strategies that exploit Ancient’s unique layout.
CT-Side Strategies:
- Default Setup: Start with two players on each site and one player mid. This default setup gives flexibility to react to T pushes while maintaining map control.
- Aggressive Mid: Send a player mid early to catch T pushes and gather information. This risky play can pay off with early picks but requires good aim and positioning.
- Stack Sites: Based on information, stack four players on one site and leave one player to anchor the other. This catches Ts off guard when they execute.
- Retake Practices: Practice retakes with specific utility and positions. Knowing exactly where to go and what utility to use during retakes saves crucial seconds.
T-Side Strategies:
- Mid Control First: Take mid control early in the round. This gives information about CT positions and flexibility to attack either site.
- Fast Executes: Execute quickly onto a site before CTs can rotate. Use smokes, flashbangs, and molotovs to clear defensive positions.
- Slow Plays: Take map control slowly, wait for CTs to rotate, then attack the site with fewer defenders. This requires patience and good communication.
- Fakes: Fake one site to draw CT rotations, then attack the other site. Effective fakes require convincing utilities and positioning.
Post-Plant Setups:
- A Site: Plant in open positions near temple or donut. Play from pit, temple, or tunnel to catch CTs during retakes.
- B Site: Plant front site or back site depending on where you enter. Play from pillar, stairs, or tunnel to defend the bomb.
Economy Considerations:
- Buy Rounds: On full buy rounds, coordinate utility usage and execute together. Don’t waste utilities on uncoordinated pushes.
- Save Rounds: On save rounds, group up and look for picks. Don’t force saves when you can damage the enemy economy.
- Force Buys: On force buys, focus on executes with utility. Pistols and SMGs are effective at close range on Ancient’s tight corridors.
Essential Utility for Ancient
Proper utility usage separates good teams from great teams on Ancient. Learning essential smokes, molotovs, and flashbangs for each situation improves your win rate significantly.
A Site Smokes:
- Cave Smoke: Blocks vision from cave, allowing safe entry to A Site.
- Temple Smoke: Blocks CTs holding from temple positions.
- Heaven Smoke: Blocks CTs holding the elevated heaven position.
- Connector Smoke: Blocks rotation from CT spawn and mid.
B Site Smokes:
- Window Smoke: Blocks CTs holding the window angle.
- Courtyard Smoke: Blocks vision from courtyard and mid.
- CT Spawn Smoke: Blocks rotations from CT spawn to B Site.
- Stairs Smoke: Blocks CTs holding the elevated stairs position.
Molotov Positions:
- A Site: Molotov temple, donut, and pit to clear defensive positions before planting.
- B Site: Molotov pillar, stairs, and back site to force CTs out of defensive positions.
- Mid: Molotov xbox, elbow, and ruins to clear CTs holding mid positions.
Flashbang Tips:
- Pop Flashes: Use pop flashes for teammates pushing into sites. Properly timed flashes give easy entry kills.
- Retake Flashes: Flash common positions before peeking during retakes. This minimizes the chance of getting traded.
- Self Flashes: Learn self flash lineups for peeking difficult angles. This catches CTs off guard when they don’t expect you to push.
Utility is only effective when used with proper timing and coordination. I recommend practicing lineups in deathmatch or with bots so you can execute them consistently during matches.
Common Mistakes to Avoid
After watching hundreds of matches on Ancient, I’ve noticed certain mistakes that consistently cost teams rounds. Avoiding these errors will immediately improve your performance.
Over-Peeking: Ancient has many angles that can be held passively. Over-peeking aggressive positions gives CTs easy kills. Instead, hold angles passively and wait for enemies to cross into your crosshair.
Ignoring Mid: Teams that ignore mid control lose the information war. Always have at least one player watching mid or ready to contest mid control. Information from mid prevents getting caught off guard.
Poor Communication: Using vague callouts like “they’re A” instead of specific positions delays reactions. Practice giving precise callouts like “two cave, one temple” to help teammates react faster.
Wasting Utility: Throwing utilities without purpose or timing wastes precious resources. Coordinate utilities with teammates and time them with executes for maximum effectiveness.
Forcing Saves: Saving when you have a reasonable chance to win the round damages your economy. Look for picks and consider forcing when you have pistols and armor.
Playing Alone: Ancient rewards coordinated team play. Playing alone without regard for teammate positions leads to isolated deaths and lost rounds.
Frequently Asked Questions
What makes Ancient different from other CS2 maps?
Ancient features a unique Mesoamerican ruins aesthetic with vertical elements and tight corridors mixed with open areas. Its layout emphasizes mid control more than most maps, with a balanced CT-T win rate around 50.8%. The map requires strong team coordination rather than individual skill dominance.
Why do professional players focus on mid-control in Ancient?
Mid control provides information about enemy movements, rotation options to both bombsites, and flanking opportunities. Teams controlling mid can support site executes, rotate faster to defend attacks, and catch enemies out of position. Mid is the central hub that connects all areas of Ancient.
What are the best ways to gain an advantage on Ancient?
Focus on mid control early, use utilities effectively for site executes, communicate with precise callouts, practice retake scenarios, and coordinate team movements. Economy management and adapting strategies based on opponent tendencies also provide significant advantages.
Is Ancient the most balanced map?
Ancient is one of the most balanced maps in the Active Duty pool with approximately 50.8% CT win rate. This near-perfect balance makes it fair for both sides when played at a high level, though individual preferences may vary based on playstyle.
How old is Ancient CS2?
Ancient was introduced during Operation Broken Fang in December 2020, making it over 5 years old as of 2026. The map has remained in the Active Duty pool due to its balanced design and competitive viability.
Conclusion
Mastering CS2 Ancient callouts is essential for competitive play. The positions, strategies, and utility tips covered in this guide provide everything you need to improve on Ancient.
Practice these callouts with your team in deathmatch and scrims. The more you use precise callouts, the faster your team will react and the more rounds you’ll win. Ancient rewards teams that communicate well and coordinate their movements.
Focus on mid control, use your utilities effectively, and avoid common mistakes. With time and practice, you’ll see improvement in your individual performance and team results on Ancient.