If you are struggling to communicate with your team on Dust 2 or cannot seem to land your smokes in the right spots, you are not alone. I have spent hundreds of hours on this map, and I will show you exactly how to master CS2 Dust 2 callouts, smokes, and strategies in this guide.
Dust 2 is arguably the most iconic map in Counter-Strike history, and understanding its callouts and smoke lineups is essential for climbing ranks. Whether you are playing CT or T side, knowing exactly where to throw grenades and how to call out enemy positions will give you a significant advantage.
In this comprehensive guide, I will break down every major callout on Dust 2, show you the most effective smoke lineups for both teams, and share strategies that actually work in 2026 gameplay. Let us dive in.
Understanding Dust 2 Map Layout (July 2026)
Before memorizing callouts, you need to understand how Dust 2 is structured. The map features two bombsites connected by a central mid area, with distinct pathways that create tactical opportunities for both teams.
The T spawn is located at the bottom of the map, with two primary routes to each bombsite. Long A provides a straight shot to A site but exposes attackers to AWP fire, while Short A offers a quicker but more risky route through mid. The B tunnels connect to both Upper B and Lower B, giving terrorists multiple options for their attack.
CT spawn sits between both bombsites, allowing defenders to rotate quickly but requiring careful positioning to catch pushes early. Mid control is crucial on this map since it connects to both bombsites and provides information about enemy movement.
What makes Dust 2 so balanced is that neither team has a significant advantage when played properly. CT side relies on holding angles and using utility effectively, while T side needs map control and coordinated executes. I have found that teams winning mid usually win the match.
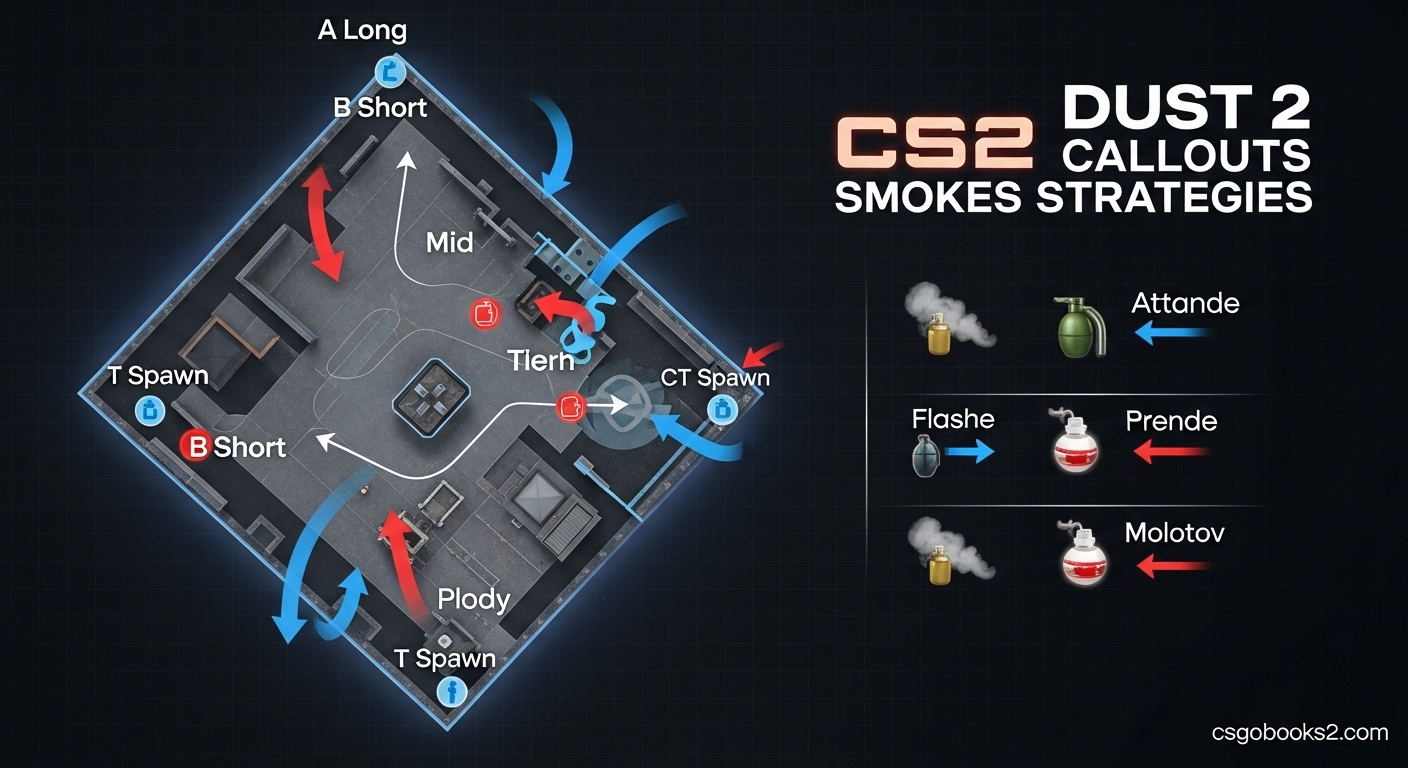
CS2 Dust 2 Callouts Smokes Strategies
This is exactly what you need to know about callouts and smokes on Dust 2. I will cover each zone systematically so you can build your knowledge from the ground up.
A Site Callouts
A site is divided into several key positions that you must know for effective communication. The most important callouts include Long, Short, CT Spawn, and the actual bombsite area.
Long A consists of multiple sub-positions. Long Doors is the entrance from T spawn area, where CTs often hold with an AWP. Long is the open area leading to A site. Pit is the depression at the end of Long where defenders can hide. The AWP Box near Pit provides cover for snipers. Goose is the small bump near A site entrance. Truck is the vehicle on A site. Stairs is the staircase leading up to the site.
Short A includes the Ramp leading up from mid, the area under CT Spawn (often called CT or Short), and the Car area near A site entrance. When holding Short, you need to watch for enemies coming from Ramp and CT Spawn simultaneously.
B Site Callouts
B site has its own set of callouts that differ significantly from A site. The main areas are Upper B, Lower B, and the bombsite itself.
Upper B is accessed through the T-side tunnels and features several key positions. B Doors is the entry point where CTs often peek. Window is the opening looking into B site from mid. Platform is the raised area where CTs frequently hold. Back Site is the area near the wall opposite B Doors.
Lower B tunnels connect to both T spawn and the B site area. Lower is the bottom area of the tunnels. Upper is the top area near B Doors. Holes is the broken section in the tunnel wall. Outside is the area exiting towards mid.
On the actual B site, you have Car (the vehicle), Boxes (the stacked crates), and Pillar (the structural column near site). These positions are crucial for post-plant situations and retakes.
Mid Callouts
Mid control is often the deciding factor on Dust 2. The key callouts here include Mid Doors, Window, and the various routes connecting to both bombsites.
From CT side, you have Mid Doors (the double doors looking towards T side), Window (the opening overlooking mid), and Under (the area below Window). The X-Box is the small crate in the middle of mid where players often peek from.
From T side, you have Top Mid (the raised area), Lower Mid (the area approaching CT side), and the routes to both Long and Short. Control of mid allows for quick rotations and information gathering.
Essential CS2 Dust 2 Smoke Strategies
Now that you know the callouts, let me show you the most effective smoke lineups for both teams. These are the smokes I use consistently in 2026 gameplay.
T-Side Smokes for A Site
When attacking A site, you need to block key angles to prevent CTs from defending effectively. The essential smokes are Long Smoke, CT Smoke, and Short Smoke.
Long Smoke from T spawn: Stand in the corner near the door, aim at the tip of the roof structure on the right side of Long Doors, and do a left-click throw. This smoke blocks vision from Long Doors and AWP positions.
CT Spawn Smoke from mid: Position yourself on the edge of the boxes near mid, look up at the antenna on the building, and do a running throw. This smoke cuts off CT vision from Short area.
Short/Car Smoke: From mid, aim at the second lamp post on the left building and do a jump-throw. This blocks CTs holding from Car and Short positions.
When executing A site, I recommend throwing Long Smoke first, then CT Smoke, followed by Short Smoke. This sequence prevents CTs from rotating or peeking during your push.
T-Side Smokes for B Site
B site executes require different smokes to block key defensive positions. The crucial smokes are B Doors, Window, and Top Mid.
B Doors Smoke: Stand in Upper B tunnels, aim at the top of the door frame, and do a left-click throw. This blocks CTs holding from B Doors and Window area.
Window Smoke: From the same position in Upper B, aim at the building edge above Window and throw. This cuts off vision from Window looking into B site.
Top Mid Smoke: Stand at the edge of Upper B looking toward mid, aim at the building corner, and throw. This prevents CTs from rotating through mid or flanking from Lower.
For a successful B execute, I recommend smoking B Doors and Window simultaneously, with one player smoking Top Mid to prevent rotations. This leaves CTs with limited options to defend the site.
CT-Side Smokes for Mid Control
CT side uses smokes differently – mostly to delay pushes and control mid. The key smokes are Top Mid and X-Box.
Top Mid Smoke from CT: Stand near Window, aim at the building edge, and do a jump-throw. This delays T pushes through mid and buys time for your team to rotate.
X-Box Smoke: From lower mid, aim at the building corner and throw. This blocks vision from X-Box and prevents T players from peeking mid aggressively.
These smokes are particularly effective in pistol rounds and eco rounds where you cannot afford to lose map control early. I use them consistently to gather information without committing to mid fights.
CT-Side Smokes for Site Retakes
When retaking A or B site, smokes are essential for blocking enemy vision and creating safe planting angles. For A site retakes, smoke Stairs and CT. For B site retakes, smoke B Doors and Car.
The key is to throw smokes that force enemies into unfavorable positions while your team pushes from multiple angles. Communication during retakes is critical – call out which smokes you are throwing so your teammates can coordinate their push.
CT-Side Strategies and Positioning
Playing CT side on Dust 2 requires understanding where to position yourself and how to use your utility effectively. Here are the strategies I recommend for 2026.
A Site Defense Setup
The standard A site setup uses two players: one at Long holding Pit or AWP Box, and one at Short holding Ramp or CT Spawn. The Long player should have an AWP if possible, while the Short player needs a rifle to handle close-range fights.
Your goal is to catch the T push early while staying alive for the retake. Do not overcommit to duels – your life is more valuable than a kill. If you see multiple enemies, fall back and call for help.
For utility, the Long player should have a molotov for Pit and a smoke for Long Doors. The Short player needs a flashbang for the execute and a smoke for CT if T takes control.
B Site Defense Setup
B site typically uses two players: one at B Doors/Window and one on the actual site. The B Doors player watches for pushes through Upper B and can rotate to help mid if needed. The site player holds from Car or Boxes and listens for tunnel activity.
B site is harder to retake than A, so preventing the plant is crucial. Use your molotovs to delay pushes and your smokes to block key angles. If T plants immediately, you may need to save depending on the round situation.
For utility, the B Doors player needs a smoke for Upper B and a molotov for the tunnel entrance. The site player should have a molotov for the plant zone and a flashbang for retakes.
Mid Control and Rotations
The fifth CT player typically holds mid and supports both sites as needed. Mid control is valuable for information but do not overextend – your primary job is to stay alive and rotate early.
When T commits heavily to one site, the mid player should rotate immediately. Do not wait for the plant call – early rotation often catches Ts in awkward positions. If both sites are under pressure, mid determines where to go based on economy and teammate positions.
For utility, the mid player needs smokes for Top Mid and X-Box, plus flashbangs to support retakes. A molotov for Lower can delay pushes effectively.
T-Side Attack Strategies
T side on Dust 2 requires coordination and utility usage to break through CT defenses. Here are the strategies that work best in 2026 gameplay.
A Site Execute
The standard A execute starts with mid control. Once you control mid, throw the Long, CT, and Short smokes simultaneously. Two players push Long while two go through Short, with one player lurking mid or flanking.
The Long players need to clear Pit, AWP Box, and Goose. The Short players clear Stairs, CT Spawn, and the site itself. The mid player watches for rotations and can push late or flank from CT Spawn.
For utility, you need three smokes (Long, CT, Short), at least two molotovs for Pit and Stairs, and flashbangs for the execute. The player planting should save a kit if possible.
B Site Execute
B executes are faster and more straightforward. Smoke B Doors and Window, then rush through Upper B with three players. Two players clear the site while one watches Lower for rotations.
The key to a successful B execute is speed. CTs often struggle to rotate in time if you commit quickly. Do not hesitate – once smokes are down, push immediately.
For utility, you need two smokes (B Doors, Window), two molotovs for the site, and flashbangs for clearing corners. One player should have a kit for the plant.
Default and Faking
Sometimes the best strategy is to take map control without committing. Default setups involve taking mid and Long control while applying pressure to both sites. This forces CTs to reveal their positions and creates opportunities for picks.
Faking involves showing to one site then quickly rotating to the other. For example, take mid control and show A, but when CTs rotate, execute B instead. This works best when you have established mid control early in the round.
Regional Callout Differences
One thing that confuses many players is that EU and NA regions use different callout names for the same positions. This can cause miscommunication in matchmaking, especially with international teammates.
The most notable difference is the “X-Box” position. In EU, players call this “Middle Box” or simply “Mid Box.” NA players exclusively use “X-Box.” Similarly, “Pit” on Long A is sometimes called “Default” in EU regions.
On B site, what NA players call “Car” is often referred to as “Vehicle” or “Van” in EU. “Truck” on A site is sometimes called “Jeep” by EU players.
When playing with international teammates, I recommend clarifying callouts at the start of the match. If someone uses a term you do not recognize, ask for clarification. It is better to spend five seconds confirming than to give wrong information during a crucial round.
How to Learn Dust 2 Callouts Fast?
Memorizing Dust 2 callouts takes time, but I have found methods that accelerate the process significantly. Here is what worked for me when learning the map.
Start by learning the major zones first: Long, Short, Upper B, Lower B, and Mid. These five areas cover 80% of in-game communication. Once you have these down, gradually add the specific positions within each zone.
Watch pro matches and streamers playing Dust 2. Pay attention to their callouts and write down any terms you do not recognize. I learned several callouts this way that I never would have discovered otherwise.
Play Deathmatch on Dust 2 to familiarize yourself with the map layout. Run around and practice saying the callouts out loud as you move through different areas. This reinforces the connection between locations and their names.
Use community resources like csnades.gg for visual references and YouTube videos for smoke lineups. Seeing the positions labeled on a map diagram helps cement the names in your memory.
Do not be afraid to ask teammates during matches. Most experienced players are happy to explain callouts if you ask politely. I have learned many positions simply by saying “What do you call that spot?” when I was unsure.
Finally, practice in casual matches before taking it to competitive. There is less pressure, and you can take time to think about the correct callout without worrying about losing rounds.
Common Mistakes to Avoid
After playing hundreds of matches on Dust 2, I have noticed several mistakes that players consistently make. Avoiding these will improve your game immediately.
The first mistake is using vague callouts like “they are at that spot near the thing.” Your teammates cannot help you if they do not know where the enemy is. Learn the proper callouts and use them consistently.
Another common issue is not committing to executes. Throwing smokes but then waiting gives CTs time to rotate and position themselves. Once you commit to a push, go all in – hesitation kills more rounds than bad strategies.
On CT side, overpeeking is a frequent mistake. Trying to get kills instead of holding angles often leads to dying without giving your team information. Remember that staying alive for the retake is often more valuable than getting one pick early.
Many players waste utility by throwing smokes at the wrong time or location. Practice your smoke lineups in a private server before using them in matches. A smoke that misses its target is worse than no smoke at all.
Finally, do not forget to communicate. Even if you do not know the perfect callout, saying something is better than saying nothing. Your team would rather hear “they are near B” than complete silence followed by an unexpected plant.
FAQ
Is Dust 2 the most balanced map?
Dust 2 is widely considered the most balanced map in CS2 due to its symmetrical design and equal opportunities for both teams. The map has been refined over two decades to minimize unfair advantages, with win rates hovering around 50-50 for CT and T sides at professional level. Neither team has a significant edge when played properly, making it the ultimate test of raw skill and strategy.
Which team has the advantage on Dust 2?
CT side typically has a slight advantage on Dust 2 at lower levels due to defensive angles and holding positions. However, at higher ranks and professional play, the map becomes nearly balanced with proper T side executes. The key advantage goes to whichever team controls mid, as it provides rotations, information, and map control. T side often wins pistol rounds and eco rounds, while CT side excels at gun rounds with proper utility usage.
How to rush B on Dust 2?
Rushing B on Dust 2 requires three smokes: B Doors, Window, and Top Mid. Throw B Doors and Window smokes simultaneously from Upper B, then rush through with three players while a fourth smokes Top Mid to prevent rotations. Two players clear the site while one watches Lower. Use molotovs to clear common CT positions like Car and Boxes. The key is speed – do not hesitate once smokes are down. Rushing B works best when you have mid control and catch CTs off guard.
How to play Dust 2 in CS2?
Playing Dust 2 effectively requires mastering callouts, smokes, and positioning for both sides. Start by learning the major zones: Long, Short, Upper B, Lower B, and Mid. Practice essential smoke lineups in a private server before using them in matches. For CT side, hold angles and use utility to delay pushes. For T side, take mid control and execute onto sites with coordinated smokes. Communicate constantly with your team using proper callouts. Focus on improving one area at a time rather than trying to learn everything at once.
What are the best strategies for CT playing Dust-II?
The best CT strategies on Dust 2 involve controlling mid, holding default positions, and rotating early. Use two players on A site (Long and Short), two on B site (Doors and site), and one flexible mid player. Mid control provides information and rotation options. Do not overpeek – staying alive for retakes is more valuable than early kills. Use molotovs to delay pushes and smokes to block key angles. Rotate immediately when T commits heavily to one site. Save in disadvantageous situations rather than force unfavorable fights. Utility usage is more important than individual aim on CT side.
Mastering CS2 Dust 2 callouts, smokes, and strategies takes time and practice, but the payoff is worth it. This map has been a staple of Counter-Strike for over two decades because it rewards fundamental skills and intelligent gameplay.
Focus on learning the major zones first, then gradually add specific positions and smoke lineups. Practice in casual matches and Deathmatch before taking your knowledge to competitive. Do not be afraid to ask questions – even experienced players had to learn these callouts at some point.
The most important thing is to communicate with your team. Even imperfect callouts are better than silence. As you play more matches on Dust 2, the positions and strategies will become second nature.
Remember that Dust 2 is balanced enough that neither side has a significant advantage when played properly. The team that communicates better and uses their utility more effectively will usually win, regardless of individual skill.