Mastering CS2 Inferno callouts banana control separates average players from those who consistently win rounds. Banana is the most contested area on Inferno, and understanding every callout, position, and strategy gives your team a massive advantage. I’ve spent hundreds of hours on Inferno, analyzing pro matches and testing strategies across all ranks. This guide covers everything you need to know about Banana control, from basic callouts to advanced techniques used by professional players.
Whether you’re pushing Banana as a Terrorist or holding it as a CT, proper communication and positioning can completely change round outcomes. Let me walk you through every aspect of Banana control so you can start winning more rounds on Inferno.
What is Banana on Inferno?
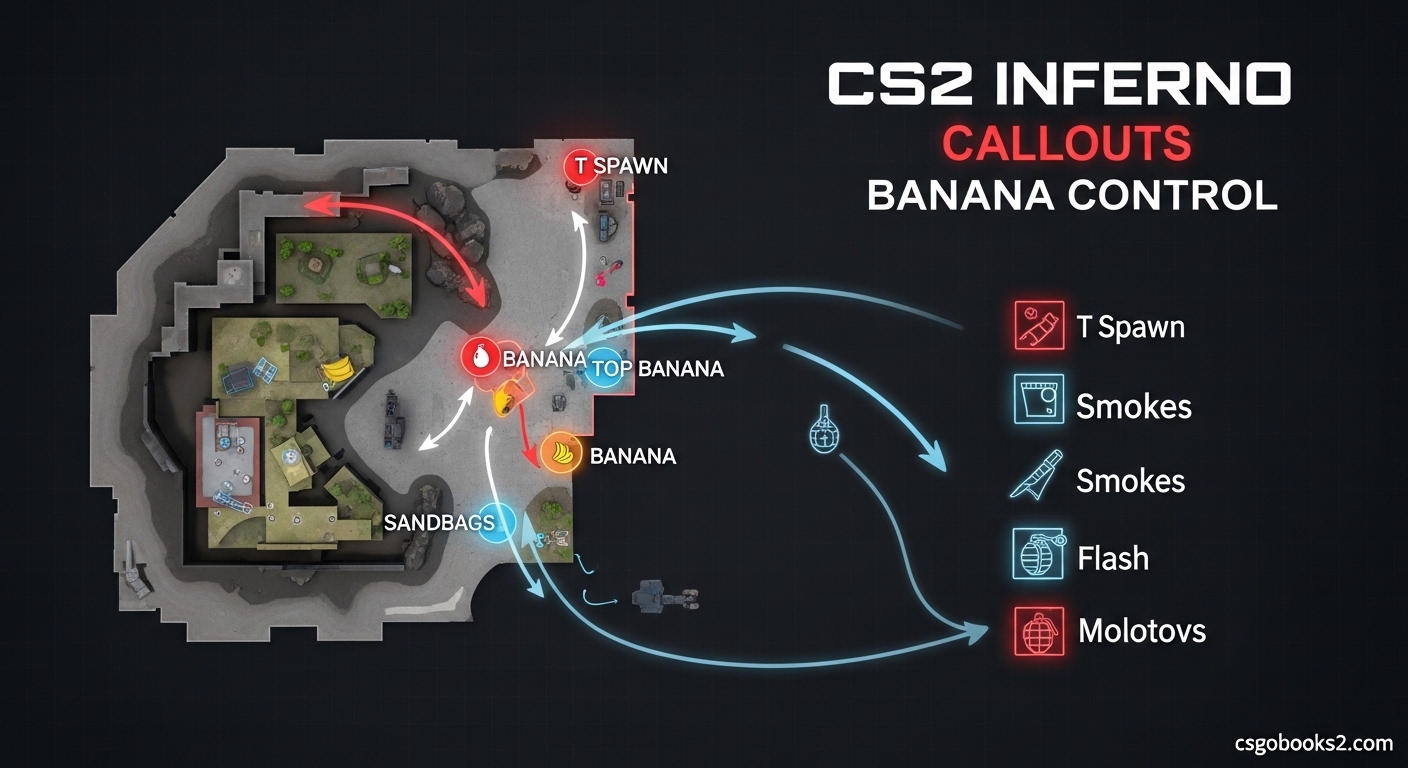
Banana is the long, curved pathway on Inferno that connects T Spawn directly to Bombsite B. It’s called Banana because of its distinctive curved shape resembling a banana when viewed from above. This narrow choke point is the primary route Terrorists use to attack B site, making it the most heavily contested area on the map.
The area stretches from the bottom near T Spawn (called Bottom Banana) up to the entrance near B site (called Top Banana). Control of Banana determines map presence and opens up strategic options for both teams. When Terrorists control Banana, they can freely execute onto B site. When Counter-Terrorists hold Banana, they delay attacks and gather crucial information.
Banana’s narrow design makes it perfect for utility usage. Molotovs, smokes, and flashbangs are incredibly effective in this confined space. Understanding every position and callout on Banana is essential for any player serious about improving their Inferno gameplay.
CS2 Inferno Banana Callouts Complete Guide (April 2026)
Every position on Banana has a specific name that players use for communication. Mastering these callouts ensures your team understands exactly where enemies are located and where to deploy utility. Let me break down each callout with positioning details and strategic importance.
Top Banana
Top Banana refers to the upper section of the pathway closest to Bombsite B. This area is critical for CTs defending B site and for Ts preparing to execute. The Top Banana area includes several key positions that defenders and attackers use throughout the round.
The CT spawn angle from Top Banana is one of the most common holding positions. CTs can peek towards Bottom Banana or fall back to B site depending on the situation. For Terrorists, establishing control of Top Banana is the final step before a B site execute.
Bottom Banana
Bottom Banana is the lower section near T Spawn and the connection to Mid. This is where Terrorists first enter Banana and where CTs often set up their first line of defense. Bottom Banana provides cover through several angles and positions.
The area near the entrance to Banana from T side is called Banana Entrance. This is where Terrorists deploy their initial utility and where CTs often throw early molotovs to delay pushes. Control of Bottom Banana is essential for Ts to begin their approach toward B site.
Car Position
The Car is one of the most iconic positions on Banana. Located on the left side when pushing from T spawn (toward B site), the burned-out car provides cover for both CTs and Terrorists. CTs often use Car to hold angles and catch Ts pushing through Banana.
The Car position creates several sightlines that make it tricky to clear. Terrorists must check Car carefully when pushing Banana, as CTs can hide behind it and catch players off guard. The area around Car also leads to the ALT Mid connection, adding another layer of complexity.
Sandbags
Sandbags is a defensive position on the right side of Banana when pushing from T spawn. This area consists of barriers and cover that CTs use to hold angles and delay Terrorist pushes. The Sandbags position provides excellent cover while maintaining visibility toward Bottom Banana.
CTs can play aggressively from Sandbags or fall back to more defensive positions. The area offers multiple angles to hold, making it unpredictable for Terrorists pushing through. Mastering the Sandbags position is crucial for CTs looking to control Banana early in the round.
Logs
Logs refers to the wooden barriers and debris located near the middle section of Banana. This area provides additional cover and creates interesting sightlines for both teams. The Logs position is particularly important for CTs setting up crossfire with teammates at other Banana positions.
The area around Logs can be tricky to navigate, with several angles that enemies can use. Terrorists must clear Logs carefully when pushing Banana, as CTs can use this position for surprise peeks and delayed tactics.
Cubby (Cubbyhole)
Cubby, or Cubbyhole, is a small recess on the side of Banana that provides cover for players. This position is often used by CTs holding Banana or by Terrorists trying to catch rotating defenders off guard. The small size of Cubby makes it easy to overlook, resulting in many unexpected kills.
Players can hide in Cubby and wait for enemies to pass before catching them from behind. However, this position is also risky, as molotovs can easily flush out anyone hiding there. Using Cubby effectively requires good timing and game sense.
ALT Mid Connection
ALT Mid (also called Alternate Mid) is the connection point between Banana and the Mid area of the map. This position allows players to rotate between areas and creates additional strategic options. CTs can use ALT Mid to flank enemies pushing through Banana or to rotate to other bomb sites.
The ALT Mid connection is a crucial part of map control. Terrorists controlling both Banana and ALT Mid have multiple options for their attack, while CTs can use this connection to defend multiple areas. Understanding when to use ALT Mid is key to advanced Banana control.
New Box
New Box is a relatively new addition to Inferno’s Banana area, providing additional cover and creating new sightlines. This position is located in the middle section of Banana and offers opportunities for both aggressive and defensive play.
The addition of New Box has changed how Banana is played, creating new angles to check and new positions to hold. Players must be aware of this position when pushing or holding Banana, as enemies can use it for surprise plays.
Tree Position
Tree is a position near the top section of Banana, named after the distinctive tree element in this area. This position provides cover and sightlines toward both Top and Bottom Banana. CTs often use Tree as a fallback position when losing control of lower Banana.
The Tree position connects to the B site area, making it important for CT rotations. Terrorists pushing through Banana must clear Tree carefully to prevent CTs from falling back and defending B site from advantageous angles.
CT Side Banana Control Strategies 2026
Playing CT side on Banana requires patience, good positioning, and smart utility usage. As a CT, your goal is to delay Terrorist pushes, gather information, and survive as long as possible. Let me share the most effective CT strategies for controlling Banana.
Player Roles and Positioning
Effective CT Banana control uses a layered approach with multiple players. The first player (often called the “anchor”) holds the furthest position toward Bottom Banana, usually at Car or Sandbags. This player’s job is to get early information and delay the push.
The second player positions further back, near Logs or Tree, providing support and crossfire. This player can trade kills if the first player dies, or fall back to B site if needed. A third player may support from ALT Mid or B site, depending on the team’s setup.
When to Contest vs. Give Up Banana?
Knowing when to fight for Banana and when to give it up is crucial for CT success. On pistol rounds and eco rounds, CTs often give up Banana early and save their utility for retaking. On full buy rounds, contesting Banana early can disrupt Terrorist timing and force them to waste utility.
If Terrorists commit heavily to Banana with multiple players and full utility, CTs should consider falling back to B site and setting up for a retake. Fighting outnumbered in Banana usually leads to unnecessary deaths. However, if Ts are passive or split their attack, CTs can maintain Banana control longer.
Utility Usage for CTs
Molotovs are the most powerful CT utility on Banana. A well-timed molotov at Bottom Banana or Car can delay Terrorist pushes for 5-8 seconds, giving CTs time to rotate and set up. CTs should save at least one molotov for mid-round when Ts attempt to push.
Smoke grenades are useful for blocking vision and creating safe retreat paths. Smoking Bottom Banana allows CTs to fall back without being picked off. Flashbangs are effective for re-peeking and catching Ts off guard, but use them carefully to avoid flashing teammates.
Rank-Specific CT Tips
In Silver and Gold ranks, CTs should focus on basic positioning and surviving. Don’t get too aggressive—stay alive as long as possible to delay the Terrorist push. In higher ranks (Master Guardian and above), CTs can play more aggressively, contesting Banana earlier and using more complex utility setups.
At the highest ranks (Legendary Eagle and above), CT Banana control becomes highly advanced, with pre-aimed angles, precise utility timing, and coordinated team plays. Adapt your strategy based on your rank and what you see from the enemy team.
T Side Banana Control Strategies
Taking Banana control as a Terrorist requires coordination, utility usage, and smart timing. When your team controls Banana, you have direct access to B site and can put massive pressure on the CT defense. Let me break down the most effective T side strategies.
Entry Techniques and Approaches
The first player pushing Banana (the entry fragger) should approach carefully, checking all common CT positions. Start by peeking Car and Sandbags, where CTs often hold. Use a teammate to flash for you, or throw your own flash to blind CTs holding common angles.
Don’t rush blindly into Banana. Take time to clear each position methodically. If you die without getting information, your team is at a disadvantage. Communicate everything you see—”CT at Car,” “no one Bottom Banana,” “they have molotov.”
Coordinated Utility Usage
Effective T side Banana takes start with utility. One player should smoke CT spawn from Banana to block CT vision. Another player can molotov common CT positions like Car or Sandbags to force CTs away. Flashbangs should be thrown to blind CTs holding angles.
Timing is everything with T utility. Don’t throw all your utility at once—coordinate with your team so utility lands simultaneously, overwhelming the CT defense. Practice these utility lineups in deathmatch or offline mode so you can execute them perfectly in matches.
Trading Kills
Trading is essential for T side Banana control. When your entry fragger pushes, the second player should be ready to trade immediately if the entry dies. Don’t wait—get the trade kill while the CT is still repositioning and reloading.
Good trading requires good positioning. The second player should be far enough back to avoid being flashed or killed by the same CT, but close enough to trade quickly. Communication is key—”I’m trading,” “I’m flashing for trade,” “CT reloading.”
Establishing Map Presence
Once your team controls Banana, you have several options. You can execute immediately onto B site while CTs are disorganized. You can wait and fake, making CTs think you’re going B while actually hitting A. Or you can split your attack, sending some players through ALT Mid for a coordinated strike.
Banana control also gives you information. If CTs are heavily defending B site after you take Banana, they might be weak at A site. Use this information to adjust your strategy and attack where CTs aren’t prepared.
Rank-Specific T Tips
In lower ranks, focus on basic utility usage and trading. Smoke CT spawn, molotov common positions, and trade kills reliably. Don’t overcomplicate your executes—simple, coordinated attacks work best.
In higher ranks, add fakes and timing plays to your repertoire. Use ALT Mid for splits and coordinate with your A site players to confuse CTs. At the highest level, Banana control becomes about prediction—outthinking CTs who expect standard strategies.
Essential Utility for Banana Control
Utility wins rounds on Banana. Both CTs and Terrorists need to master essential smokes, molotovs, and flashbangs to control this critical area effectively. Let me cover the most important utility lineups and when to use them.
CT Side Utility
CT molotovs on Banana are incredibly powerful. The “Car molotov” lands directly on the Car position, forcing any Ts there to move. The “Bottom Banana molotov” covers the entrance from T spawn, delaying pushes for several seconds. The “ALT Mid molotov” prevents Ts from flanking through Mid.
CT smokes are primarily for blocking vision and creating safe retreat paths. Smoking Bottom Banana allows CTs to fall back to B site without being picked off. Smoking ALT Mid blocks Ts from using that connection. Flashbangs are useful for re-peeking and catching Ts off guard, but be careful not to flash teammates.
T Side Utility
T side utility on Banana focuses on clearing positions and enabling the push. The “CT spawn smoke” from Banana blocks CT vision and allows Ts to push safely. The “Car molotov” forces CTs away from their most common holding position. The “Sandbags molotov” clears another defensive angle.
T side flashbangs are crucial for the entry. A “pop flash” over the Car or Sandbags can blind CTs holding those positions, allowing the entry fragger to peek safely. Coordinate flashes with your team so multiple utility items land at the same time, overwhelming the CT defense.
Economy Considerations
Utility is expensive, so manage your economy carefully. On full buy rounds, both teams should have full utility for Banana. On eco rounds, you might need to save utility or buy cheaper options. Consider what utility your team needs and buy accordingly—if three players already have molotovs, the fourth player might buy a smoke or flash instead.
Force buy rounds are tricky on Inferno. Sometimes it’s better to save for a full buy next round rather than forcing with limited utility. Assess the situation and communicate with your team about utility purchases.
Practice Tips
Mastering Banana utility takes practice. Spend time in offline mode throwing molotovs and smokes until you can hit the same spot consistently. Practice pop flashes so you can execute them quickly in matches. Review your demo recordings to see if your utility was effective and identify areas for improvement.
Watching pro players is another great way to learn. Notice how pros use utility on Banana—when they throw it, where they aim, and how they coordinate with teammates. Try to incorporate their techniques into your own gameplay.
Common Banana Mistakes to Avoid
After watching hundreds of matches across all ranks, I’ve identified the most common mistakes players make on Banana. Avoiding these mistakes will instantly improve your Inferno performance.
Positioning Errors
The most common CT mistake is holding too aggressively without support. Peeking Bottom Banana alone against multiple Ts usually results in dying without getting information. CTs should play with teammates nearby and have a fallback plan.
For Terrorists, pushing Banana without clearing positions is a frequent mistake. Running past Car or Sandbags without checking leads to dying from unexpected angles. Take your time and clear each position methodically.
Utility Mistakes
CTs often waste molotovs too early in the round, leaving them vulnerable when Ts actually push. Save at least one molotov for mid-round when the execute begins. Ts sometimes throw all their utility at once instead of coordinating—this gives CTs time to reset and prepare.
Another common mistake is throwing utility that doesn’t actually help. A molotov that lands behind cover or a smoke that blocks your own team’s vision is worse than no utility at all. Practice your lineups so your utility is always effective.
Communication Failures
Poor communication leads to uncoordinated Banana control. Not calling enemy positions, failing to communicate utility usage, and not coordinating pushes are all common issues. Use your microphone and communicate clearly—”CT at Car,” “I’m smoking Bottom,” “They’re pushing now.”
CTs often don’t communicate when they’re falling back, leaving teammates isolated. Ts sometimes push without telling their team, resulting in uncoordinated attacks. Good communication is free and instantly improves your win rate.
Timing Issues
CTs sometimes contest Banana for too long, dying unnecessarily. Recognize when you’re outnumbered or outgunned and fall back to B site. Ts sometimes wait too long to execute, giving CTs time to rotate and set up a strong defense.
Round timing is crucial on Inferno. Practice recognizing the right moments to contest, fall back, push, and execute. Good timing comes with experience, so pay attention to the round clock and learn from your mistakes.
How to Fix These Mistakes?
The first step to fixing mistakes is recognizing them. Watch your demo recordings and identify specific errors in your gameplay. Are you peeking too aggressively? Is your utility ineffective? Are you communicating enough?
Once you’ve identified your mistakes, focus on fixing one at a time. Don’t try to fix everything at once—work on your positioning first, then your utility, then your communication. Gradual improvement leads to lasting results.
Finally, practice consistently. Spend time in deathmatch improving your aim, in offline mode practicing utility, and in matches applying what you’ve learned. Improvement takes time, but avoiding common mistakes accelerates the process.
Frequently Asked Questions
How to take Banana control CS2?
Start by smoking CT spawn from Banana to block their vision. Throw a molotov on Car or Sandbags to clear common CT positions. Have a teammate flash you in, then peek carefully and clear each angle methodically. Trade kills if your entry fragger dies, and communicate everything you see to your team.
What is Banana in Inferno?
Banana is the long, curved pathway on Inferno that connects T Spawn to Bombsite B. It’s called Banana because of its distinctive curved shape resembling a banana when viewed from above. This narrow choke point is the primary route Terrorists use to attack B site, making it the most heavily contested area on the map.
Is Inferno C or CT?
Inferno is considered a CT-sided map, meaning Counter-Terrorists generally have the advantage. The narrow choke points (especially Banana) favor CTs who can use utility and positioning to delay attacks. However, with proper coordination and utility usage, Terrorists can effectively take control and win rounds on Inferno.
How to hold B Inferno CS2?
Hold B site by controlling Banana and using utility effectively. Position one player at Car or Sandbags to get early information. Keep a second player at Logs or Tree for support and crossfire. Save molotovs for mid-round when Ts execute, and fall back to B site if outnumbered. Use ALT Mid for rotations and flanking opportunities.
Conclusion
Mastering CS2 Inferno callouts banana control takes time and practice, but the payoff is worth it. Understanding every position on Banana—from Top Banana to Bottom Banana, Car to Sandbags—gives you a massive advantage on this crucial map area.
Focus on the fundamentals first: learn all the callouts, practice your utility lineups, and communicate effectively with your team. As you improve, add advanced techniques like rank-specific strategies, timed executes, and pro player tactics. Review your demos, learn from your mistakes, and consistently practice to see real improvement.
Banana control wins rounds on Inferno. Use this guide to master every aspect of Banana, and you’ll start winning more rounds and climbing the ranks. Good luck, and I’ll see you on the server!