Mirage stands as one of the most played competitive maps in Counter-Strike 2, and knowing your CS2 Mirage callouts can be the difference between winning and losing rounds. I’ve spent hundreds of hours on this map across multiple ranks, and I’ll tell you firsthand: communication matters more than almost anything else.
When I first started playing Mirage competitively, I lost countless rounds because I couldn’t quickly tell my teammates where enemies were. “They’re… near that thing with the boxes” doesn’t work when seconds matter. That’s why mastering CS2 Mirage callouts, lineups, and strategies is essential for any player looking to climb ranks in 2026.
In this guide, I’ll break down every major callout on Mirage, explain the strategic importance of each position, cover essential utility lineups for both CT and T sides, and share practical strategies that actually work in real matches. Whether you’re new to CS2 or looking to refine your Mirage knowledge, this guide has you covered.
Understanding Mirage’s Layout and CS2 Mirage Callouts
Mirage features a classic three-lane layout with A site on one side, B site on the other, and mid control connecting everything. The map’s symmetry makes it unique among CS2 maps, and understanding how the three areas connect is crucial for effective CS2 Mirage callouts.
CS2 brought some important changes to Mirage. The most significant? Smoke grenades now interact differently with HE grenades – an HE explosion will partially disperse smoke, creating new tactical possibilities. This change affects how you approach utility lineups and site executes on Mirage in 2026.
The map’s design heavily rewards mid control. Whichever team controls mid can effectively rotate between A and B sites while denying the enemy’s movement. This is why mid-related CS2 Mirage callouts are among the most frequently used in competitive play.
CS2 Mirage Callouts: A Site Complete Breakdown
A site on Mirage features multiple distinct areas, each with its own CS2 Mirage callouts and strategic importance. I’ll break down each position from both CT and T perspectives, since the same area often has different names depending on which side you’re playing.
Palace Area – The Foundation of A Site CS2 Mirage Callouts
Palace refers to the two-story building on the A site side of mid. The bottom floor is commonly called “Palace” or “Palace Lower,” while the upper floor is “Palace Balcony” or simply “Balcony.” This area is crucial for CT players holding angles from mid and for T players pushing toward A site.
From a CT perspective, Palace offers excellent defensive angles. Players can hold “Palace Window” to watch for mid pushes or position on “Palace Balcony” to cover the A site entrance. T-side players will often flash over Palace to execute onto A or use Palace as a rotational path after mid control.
The most common mistake I see? CT players overcommitting to Palace and leaving A site vulnerable. Remember: Palace is a support position, not your primary anchor spot unless your team’s strategy specifically calls for it.
Apartments and Stairs – Critical CS2 Mirage Callouts for T Side
Apartments (often called “A Apps”) is the T-side approach to A site, featuring two distinct levels. “Stairs” or “A Stairs” connects the lower level to the site, while “Apt Balcony” overlooks the actual bomb site. These CS2 Mirage callouts are essential for T-side executes.
When T-side players execute A site, they’ll typically coordinate utility through Stairs while pushing from multiple angles. CT players holding A site need to watch Stairs carefully, as it’s a common entry point. The “Apt” area also includes “Long” which provides sightlines toward Palace and CT spawn.
Pro tip for T players: Don’t push Apartments without utility. A well-placed smoke or flash can make the difference between a successful plant and a quick death. For CT players, playing close to Stairs with a teammate covering Long is often more effective than holding passive angles.
Connector and Ramp – Bridge Between Mid and A Site
Connector is the corridor linking mid to A site, and it’s one of the most hotly contested positions on Mirage. “Ramp” or “A Ramp” specifically refers to the sloped section leading from Connector onto the actual A site. These CS2 Mirage callouts see constant action throughout a match.
For CT players, Connector offers opportunities to catch T players pushing from mid or Apartments. However, it’s also incredibly dangerous – one wrong peek and you’re giving the enemy free access to A site. T players use Connector to rotate after taking mid control or as a fake route to draw CT attention.
I’ve seen too many players treat Connector casually. This area demands respect. Always have utility or teammate support before committing to Connector fights, regardless of which side you’re playing.
A Site Positions – The Core CS2 Mirage Callouts for Plant Situations
Once you’re actually on A site, specific CS2 Mirage callouts become crucial for post-plant situations and enemy positioning. “Jungle” refers to the boxes and cover near the Palace-side of the site. “Sandwich” is the position between the two bomb plant locations (often called “Site” and “Long”). “Tetris” describes the stacked box formation near Stairs.
These CS2 Mirage callouts become critical during post-plant situations. CT players retaking need to clear Jungle, Sandwich, and Tetris systematically, while T players defending the plant will use these positions for crossfire and angle advantage.
CS2 Mirage Callouts: B Site Complete Breakdown
B site has a completely different character from A site – more enclosed, more tactical, and with its own distinct set of CS2 Mirage callouts that every player needs to know.
Market and B Apartments – The T Side Approach
Market is the main T-side route to B site, featuring a long corridor with multiple angles and positions. “B Apps” or “B Apartments” refers to the connecting area that links Market to the actual B site. These CS2 Mirage callouts are fundamental for T-side B executes.
The Market area includes several important sub-positions. “Market Entrance” is where T players first enter from T spawn. “Market Window” provides a view toward B site and CT spawn areas. “Market Boxes” offers cover for pre-prepare positions and utility throws.
T-side players executing B typically smoke CT spawn and Window, then push through Market with coordinated flashes. CT players need to balance holding Market angles without overextending and giving away easy picks.
Van and Bench Areas – Defensive CS2 Mirage Callouts
Van is one of the most iconic positions on Mirage – the actual vehicle located between B site and Market. “Bench” refers to the seating area opposite Van. These CS2 Mirage callouts represent common CT defensive positions and T-side approach paths.
From a CT perspective, Van offers a strong defensive angle against Market pushes while maintaining sightlines to the actual B site. However, it’s also a predictable position that experienced T players will pre-fire. Bench provides alternative angles but leaves you more exposed.
T players will often use Van and Bench as reference points for utility throws or as temporary cover during executes. Understanding the geometry around these CS2 Mirage callouts helps with both offense and defense.
Ticket Booth, Window, and B Site Proper
As you approach the actual B site from CT spawn, you’ll encounter several key CS2 Mirage callouts. “Ticket Booth” is the small structure near CT spawn. “Window” is the opening looking toward Market and B approaches. “B Site Proper” or simply “Site” refers to the bomb plant area itself.
The B site includes several important sub-positions: “Default” plant location near the boxes, “Car” (another vehicle position), “Firebox” (the structure with the fire icon), and “Backsite” (positions toward CT spawn). Each of these CS2 Mirage callouts represents tactical advantages during post-plant situations.
CT players holding B typically position at Window, Ticket Booth, or on the actual site with crossfire setups. T players taking B need to systematically clear these positions, often using utility to flush out CT players from common angles.
Mid Control CS2 Mirage Callouts and Strategic Importance
Mid control is arguably the most important aspect of Mirage gameplay, and the associated CS2 Mirage callouts are among the most frequently used in competitive matches.
Why Mid Control Determines Match Outcomes?
Whoever controls mid on Mirage effectively controls the match. Mid control allows rotations between A and B sites, denies the enemy’s movement, and creates opportunities for picks and information. The CS2 Mirage callouts around mid are constantly referenced throughout a match.
From a tactical perspective, mid control provides map presence. T-side players with mid control can threaten both sites, force CT rotations, and execute with flexibility. CT players with mid control can protect both sites, gather information, and set up crossfires with their teammates.
In my experience, teams that consistently lose mid control rarely win matches on Mirage. It’s that important. Dedicate practice time specifically to mid fights and the associated CS2 Mirage callouts.
Underpass, Window, and Mid Stairs
Underpass is the tunnel connecting lower mid to B side areas. “Window” refers to the opening overlooking mid from the CT side. “Stairs” or “Mid Stairs” is the sloped area connecting lower mid to the central mid area. These CS2 Mirage callouts are essential for mid control fights.
CT players typically hold mid with players at Window and Stairs, creating crossfire angles against T pushes. T players approaching mid need to coordinate utility and timing to challenge these positions effectively. Underpass provides a flanking route but is risky without proper support.
Common mistake? CT players playing too passively at mid. While you shouldn’t overextend, giving mid control away without contest makes the rest of the map significantly harder to defend.
Connector Revisited – The Mid to A Link
We mentioned Connector earlier in the A site section, but from a mid control perspective, it takes on additional importance. T-side players with mid control can threaten A through Connector, while CT players can use Connector to support A site or retake mid.
The CS2 Mirage callouts around mid-Connector intersection see constant action. “Top Mid” is the elevated area near T spawn. “CT Mid” refers to the area outside Connector. Each position offers different advantages and sightlines that change based on who controls the area.
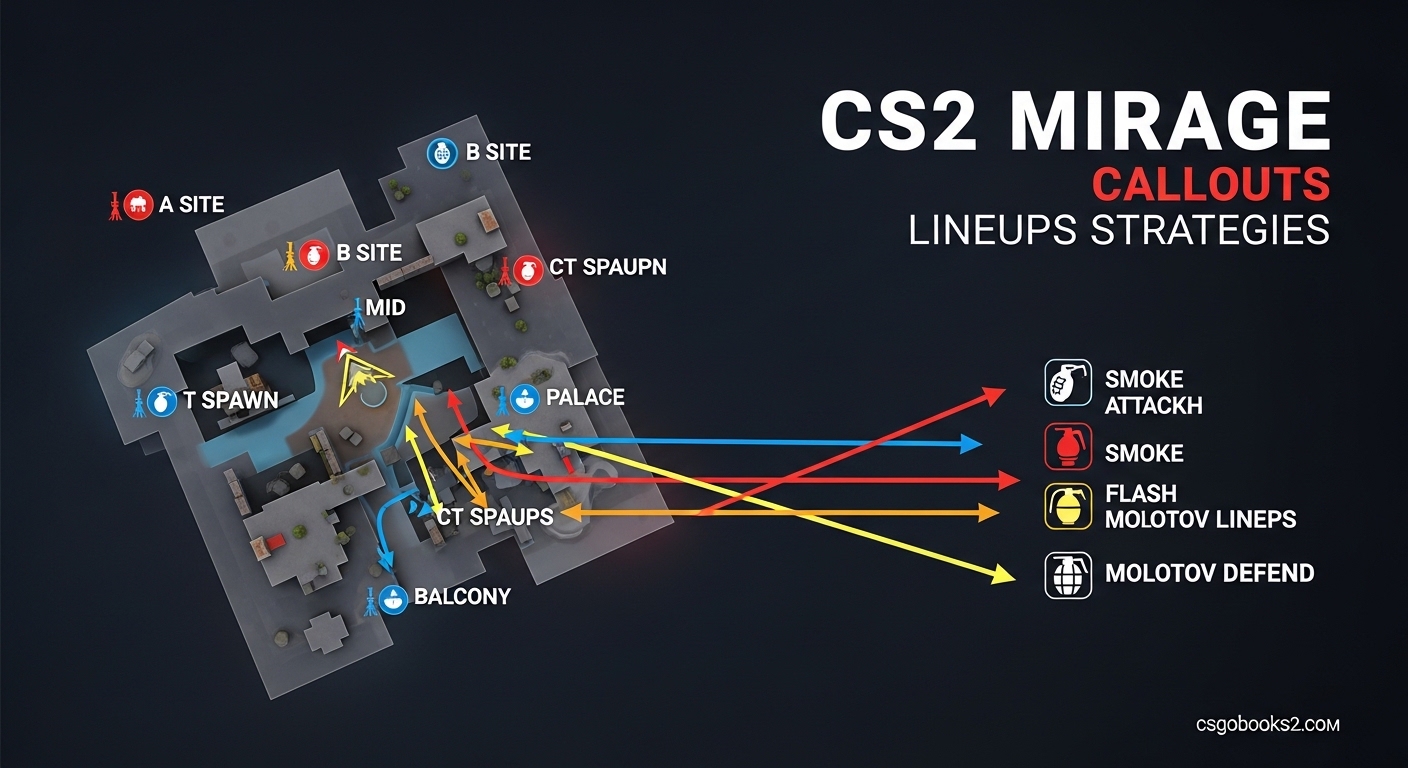
Essential Smoke Lineups for CS2 Mirage
Mastering smoke lineups separates average players from good players on Mirage. I’ll cover the essential smokes for both T and CT sides, with specific CS2 Mirage callouts for reference points.
T-Side Essential Smoke Lineups
T-side smoke execution is crucial for successful site takes on Mirage. Here are the must-know smokes for 2026:
Stairs Smoke: Stand at the edge of Palace, aim at the specific corner of the building roof, and throw with a left-click. This smoke blocks CT vision from Stairs, allowing safer pushes from Apartments. Reference point: the third roof tile from the left edge.
Connector Smoke: From T spawn, position yourself at the corner, aim above the middle archway, and do a running throw. This smoke cuts off CT rotations from mid to A site. Timing matters – throw this as your team approaches mid.
Window Smoke: From Top Mid, position yourself at the barrier, aim at the top of the window frame’s left side, and throw with a left-click. This smoke is essential for mid control and B site executes. Practice this lineup – it’s one of the most used CS2 Mirage utility throws.
Jungle Smoke: From Apartments, position in the corner near Long, aim at the top of the Palace building’s roof edge, and throw with a running motion. This smoke blocks CT vision from Jungle, making A site entry safer.
CT Spawn Smoke (for B executes): From Market, position yourself at the corner near the boxes, aim at the top of the building visible through the Market exit, and throw with a left-click. This smoke delays CT rotations from spawn to B site.
Important CS2 mechanic note: HE grenades will partially disperse these smokes. Plan your executes accordingly, and consider throwing an HE after your smokes are deployed to intentionally create sightlines for your team.
CT-Side Essential Smoke Lineups
CT-side smokes on Mirage focus on delaying executes and protecting retake routes. These CS2 Mirage lineups are crucial for defensive success:
Top Mid Smoke: From CT spawn, position yourself at the boxes near the car, aim at the top of the middle building’s roof, and throw with a left-click. This smoke delays T pushes from mid and buys time for rotations.
Jungle Smoke (from A site): From A site near ramp, position yourself against the boxes, aim at the top of the Palace roof’s right side, and throw with a left-click. This smoke blocks T vision from Jungle during retakes.
Stairs Smoke (from CT side): From A site, position yourself near Sandwich, aim at the roof edge visible through the Stairs entrance, and throw with a running motion. This smoke can delay T pushes from Apartments.
Market Smoke: From B site near Ticket Booth, position yourself at the corner, aim at the top of the Market exit frame, and throw with a left-click. This smoke delays T pushes from Market and supports B site defense.
Molotov Lineups and Flashbang Spots for CS2 Mirage
Beyond smokes, molotovs and flashbangs are essential for successful executes and defenses. I’ll cover the most impactful lineups using CS2 Mirage callouts.
T-Side Molotov Lineups
Jungle Molotov: From Palace, position yourself at the boxes, aim at the top of the wall visible through the Window, and throw with a running motion. This molotov clears CT players from Jungle during A executes.
CT Spawn Molotov: From Top Mid, position at the barrier, aim at the roof edge above CT spawn, and throw with a left-click. This molotov delays CT rotations during both A and B executes.
Backsite Molotov: From B Market entrance, position at the corner, aim at the top of the wall visible through the B site entrance, and throw with a left-click. This molotov clears CT players from Backsite positions during B executes.
Flashbang Lineups for Both Sides
Palace Flash (for T pushes): From lower mid, position yourself at the boxes, aim at the top corner of the Palace building, and throw with a left-click. This flash pops over Palace, blinding CT players holding Balcony or Window.
Stairs Flash (from T side): From Apartments, position at the corner near Long, aim at the roof edge visible through Stairs, and throw with a running motion. This flash helps teammates push from Long or Palace onto A site.
Market Flash (for B executes): From T spawn, position at the corner near the wall, aim at the top of the Market exit frame, and throw with a left-click. This flash blinds CT players holding Market angles.
CT-Side Strategies and Positioning on Mirage
Effective CT-side play on Mirage requires understanding default setups, anchor positions, and rotation timing. These strategies rely heavily on proper CS2 Mirage callouts for communication.
Default Setup and Anchor Positions
A standard CT setup on Mirage typically uses two players on A site, two on B site, and one player mid. The A site players might position at Stairs and Jungle, with the mid player covering Window and Connector angles. B site players typically hold Window and Ticket Booth or Van positions.
Communication using proper CS2 Mirage callouts is essential. A player at Window should call “Window push” if they see T players approaching mid, not just “they’re coming.” Specific information allows faster rotations and better preparation.
Anchor positions – the players staying on sites during default rounds – need to balance holding angles with staying alive. Don’t give away your position early unless you have information or a clear advantage. Living to retake is often more valuable than dying for an early pick.
Rotation Timing and Mid Round Calls
Rotation timing on Mirage can win or lose rounds. Rotate too early, and you leave sites vulnerable to fakes. Rotate too late, and the bomb is already planted with insufficient time for retakes.
Use mid control information to inform rotations. If your mid player calls “T spawn smoke” or “Market push,” you can anticipate which site is under attack. The mid player’s job is crucial – they’re the information hub for the CT side.
During retakes, use CS2 Mirage callouts to coordinate. “Stacking Long” or “Pushing Stairs” helps your teammates understand your approach. Systematic clearing of Jungle, Tetris, and Sandwich (for A) or Van, Car, and Firebox (for B) makes retakes more effective.
T-Side Strategies and Executes on Mirage
Successful T-side play on Mirage requires coordinated executes, utility usage, and adaptability. These strategies depend on proper CS2 Mirage callouts for timing and positioning.
A Site Execute Strategies
Effective A executes on Mirage typically require at least three smokes: Stairs, Connector, and Jungle. Execute with a timed approach – throw smokes, follow with flashes, and push simultaneously from Apartments and Palace/Connector.
Communication during executes is crucial. “Pushing Stairs in 3…2…1…” helps coordinate the timing. Use CS2 Mirage callouts to specify where you’re planting: “Planting Long” or “Planting Site” tells your team where to set up post-plant positions.
Post-plant, position yourself to cover likely CT push angles. If planted Long, one player covers Jungle while another covers Stairs. If planted Site, cover Connector and Long. Crossfire setups make retakes significantly harder for CT players.
B Site Execute Strategies
B executes on Mirage require Window smoke and typically CT spawn smoke or Market smoke depending on your approach. Execute with coordinated utility – flash for teammates, molotov common CT positions, and plant together.
The “fast B” strategy involves rushing B with immediate smokes and flashes, catching CT players off guard before they can rotate. The “slow B” involves taking mid control first, then executing B from multiple angles with full utility.
Post-plant on B, position at Van, Car, or Market entrance to cover retake angles. CT players will typically approach from Ticket Booth, CT spawn, or Window, so set up crossfires to cover these routes.
Mid Control Takes and Fakes
Controlling mid opens up strategic options for T-side players. A “mid take” typically involves smoking Window and CT positions, then taking control of Top Mid and Connector areas. From mid control, you can threaten both sites or execute fakes to draw CT rotations.
Effective fakes require selling the execute. Use smokes, flashes, and footsteps to make the CT team believe you’re committing to one site, then rotate to the other. The CS2 Mirage callouts used during fakes help sell the deception – “Pushing A” or “B execute in 10” can draw rotations even if you’re not actually committing.
How to Learn CS2 Mirage Callouts Effectively?
Learning Mirage callouts takes time, but the right approach makes the process much more efficient. I’ve taught these CS2 Mirage callouts to countless players, and here’s what works best.
Step-by-Step Learning Approach
Don’t try to memorize every CS2 Mirage callout at once. Start with the essential positions: A site (Stairs, Jungle, Sandwich), B site (Van, Market, Ticket Booth), and mid (Window, Connector, Underpass). Learn these foundational CS2 Mirage callouts first, then expand to secondary positions.
Study visual maps offline before playing. Look up CS2 Mirage callout diagrams and spend 5-10 minutes familiarizing yourself with the layout. Then, load into an empty server and walk around the map, naming each position as you encounter it. This active recall helps cement the CS2 Mirage callouts in your memory.
Focus on one area at a time. Spend a match specifically learning A site positions, then another match on B site, then mid. Trying to learn everything simultaneously leads to confusion and slower progress.
Practice Routines for Solo Players
Solo players can effectively learn CS2 Mirage callouts with focused practice routines. Start deathmatch games on Mirage and consciously use callouts for your own positioning – “I’m playing Jungle” or “Holding Van.” This reinforces the associations between locations and names.
Watch your own demos and pause at key moments. Identify where you are on the map, then name the position using proper CS2 Mirage callouts. This helps bridge the gap between knowing callouts intellectually and instantly recognizing them during matches.
Use CS2 Mirage callout resources like interactive maps or video guides. The csnades.gg interactive Mirage tool lets you click on positions to see their names and utility lineups. Visual and interactive learning is often more effective than text-only study.
Team Practice Considerations
Practicing with a team dramatically accelerates learning CS2 Mirage callouts. Play practice matches where callout accuracy is prioritized over winning. When you make a mistake, correct it immediately: “That was actually Jungle, not Palace.”
Run execute drills in private matches. Practice smoking, flashing, and pushing sites while using proper CS2 Mirage callouts throughout. Muscle memory from these drills will translate to real match situations.
Encourage teammates who are learning CS2 Mirage callouts. A positive learning environment helps everyone improve faster. When a teammate uses the wrong callout, provide the correct term without criticism. Everyone was a beginner once.
Common Mistakes to Avoid
The most common mistake? Trying to learn too many CS2 Mirage callouts at once and getting overwhelmed. Focus on essential positions first, then gradually expand your knowledge. Quality of understanding beats quantity of memorized terms.
Another mistake is learning CS2 Mirage callouts without understanding their strategic importance. Knowing “Jungle” means nothing if you don’t understand why holding that position matters or what angles it covers. Learn the why behind the callouts.
Finally, don’t be the player who refuses to use standard CS2 Mirage callouts because you prefer different terms. Consistency matters for team communication. Standard callouts might seem arbitrary, but they work because everyone agrees on them.
CS2 Mirage Callouts: Regional Differences and Pro Names
CS2 Mirage callouts can vary by region and sometimes professional players use different names for the same positions. Understanding these variations helps when playing with diverse teammates or watching professional matches.
Regional Variations in CS2 Mirage Callouts
Some CS2 Mirage callouts have regional alternatives. For example, “Forest” is sometimes used instead of “Jungle” for the A site boxes area. “Stairs” might be called “Ramp” by some players, though this can create confusion since “Ramp” also refers to other positions on different maps.
European players might use different CS2 Mirage callouts than North American players. These differences aren’t wrong – they’re just regional variations. However, when playing with mixed teams, default to the most widely accepted callouts to avoid confusion.
The key is flexibility. If a teammate uses a different CS2 Mirage callout than you’re used to, adapt and use their term for consistency. Communication clarity matters more than being “right” about terminology.
Pro Player Names vs. Standard CS2 Mirage Callouts
Some positions on Mirage are named after professional players who popularized specific angles or positions. For example, certain positions in Jungle or on B site might be called “s1mple position” or “device spot” by some players.
While these pro-name CS2 Mirage callouts can be fun and show CS2 knowledge, they’re generally not recommended for standard play. Pro names create confusion when not everyone follows professional CS2, and they change as new players emerge with new signature positions.
Stick with standard CS2 Mirage callouts for general matchmaking and team play. Reserve pro names for casual discussion with friends who share your CS2 knowledge. When in doubt, clarity beats cleverness.
Advanced Strategies and Economy Considerations for CS2 Mirage
Beyond basic callouts and executes, advanced Mirage play involves economy management, team composition, and mid-round adaptations. These advanced concepts build on your CS2 Mirage callouts foundation.
Economy Management Specific to Mirage
Mirage’s layout creates unique economy considerations. Because mid control is so valuable, teams that win mid rounds often force the enemy into uncomfortable economic situations. A won mid round with an AK-47 pickup can snowball into multiple round wins.
Utility expenditure on Mirage is higher than many maps due to the importance of smokes for both sides. CT teams often need multiple smokes per round to properly defend, while T-side almost requires full utility for successful executes. Budget accordingly – don’t force buy without utility if you can avoid it.
The “mid round” economy state – where both teams have rifles but limited utility – heavily favors whichever team controls mid. Consider aggressive mid takes during these rounds to capitalize on your utility advantage or exploit the enemy’s lack thereof.
Team Composition and Role Assignment
Effective Mirage play requires proper role assignment based on player strengths and CS2 Mirage callouts knowledge. Your best rifler should anchor sites, while your best AWPer might play mid or flexible positions. Entry fraggers need to know execute paths and utility timing.
Support players should master utility lineups – they’re often throwing the critical smokes and flashes that enable executes. In-game callers need comprehensive CS2 Mirage callouts knowledge to make effective mid-round decisions and rotations.
Consider your team’s strengths when developing strategies. If your team excels at mid control, design strategies around taking mid early and punishing enemy rotations. If your team has strong anchor players, play more passive CT setups that rely on retakes.
FAQs
What are the essential Mirage callouts?
The essential Mirage callouts include A site positions (Stairs, Jungle, Sandwich, Tetris), B site positions (Van, Market, Ticket Booth, Window), and mid control areas (Window, Connector, Underpass, Top Mid). Master these 15-20 core callouts first before learning secondary positions. These form the foundation of effective communication on Mirage.
How to learn Mirage map callouts in CS2?
Start by studying visual maps offline to understand the layout. Load an empty server and walk around naming each position. Focus on one area at a time (A site, then B site, then mid) rather than trying to memorize everything at once. Practice with teammates and use callouts actively during matches. Use interactive tools like csnades.gg for visual learning. Most players need 5-10 hours of focused practice to master essential callouts.
What are the best strategies for CT and T sides on Mirage?
CT-side best strategies include: default setup with 2A/2B/1mid, anchor positions at Stairs and Jungle for A, Window and Ticket Booth for B, and mid player controlling Window/Connector. Rotate based on mid player information. T-side best strategies: take mid control first, execute with coordinated smokes and flashes, sell fakes to draw rotations, and set up crossfires post-plant. Mid control is crucial for both sides – whoever controls mid typically controls the match.
Where to throw smokes on Mirage?
Essential T-side smokes: Stairs smoke (from Palace aiming at roof corner), Connector smoke (from T spawn aiming at archway), Window smoke (from Top Mid), Jungle smoke (from Apartments). Essential CT-side smokes: Top Mid smoke (from CT spawn), Jungle smoke (from A site), Market smoke (from B site). Practice these lineups in empty server. Remember CS2 mechanic: HE grenades partially disperse smoke, creating new tactical possibilities.
What are the key positions on Mirage?
Key positions include Palace (two-story building at A side of mid), Apartments (T-side approach to A), Connector (mid to A link), Market (T-side route to B), Van (iconic vehicle position), Window (overlooking mid from CT side), and Underpass (tunnel to B side). Understanding these positions and their sightlines is crucial for both holding and executing. Each position offers specific advantages and requires particular utility approaches.
How to execute A site on Mirage?
A successful A execute requires at least three smokes: Stairs, Connector, and Jungle. Time your approach – throw smokes, follow with flashes, then push simultaneously from Apartments and Palace/Connector. Use molotovs to clear common CT positions like Jungle. Plant together and call out plant location. Post-plant, set up crossfires covering likely CT push angles. Communication and timing are more important than individual mechanics.
How to defend B site on Mirage?
Effective B defense starts with proper positioning. Hold angles at Window and Ticket Booth or Van. Don’t overcommit to Market without support. Use smokes to delay executes and buy time for rotations. Listen for footsteps and utility usage to anticipate execute timing. During retakes, systematically clear Van, Car, and Firebox positions. Crossfire setups make B significantly harder for T-side to take. One player can also anchor at Ticket Booth while another supports from CT spawn or Window.
What are the must-know nades for Mirage?
Must-know smokes: T-side Stairs, Connector, Window, Jungle, CT spawn. CT-side Top Mid, Jungle, Market. Must-know molotovs: Jungle, Backsite, CT spawn. Must-know flashes: Palace flash, Stairs flash, Market flash. Utility is essential on Mirage – executes rarely succeed without proper smoke coverage and flash support. Learn 3-5 core lineups for each grenade type before expanding to advanced utility. Practice lineups in empty server until consistent.
Conclusion: Mastering CS2 Mirage Callouts for Competitive Success
CS2 Mirage callouts, lineups, and strategies form the foundation of competitive play on one of Counter-Strike 2’s most important maps. Mastering these elements takes time and practice, but the competitive advantage is undeniable.
Start with the essential CS2 Mirage callouts: A site positions (Stairs, Jungle, Sandwich), B site positions (Van, Market, Ticket Booth), and mid control areas (Window, Connector, Underpass). Practice these until they become second nature, then expand your knowledge to secondary positions and advanced strategies.
Remember that communication is the ultimate purpose of CS2 Mirage callouts. Use them consistently, encourage teammates to learn them, and maintain clarity even in high-pressure situations. A team that communicates effectively with precise CS2 Mirage callouts will consistently outperform teams with better aim but worse communication.
The journey from CS2 beginner to competitive player includes mastering Mirage’s callouts and strategies. Study visual maps, practice in empty servers, and use callouts actively during matches. With consistent practice and the right approach, you’ll be calling out positions like a pro in no time.